Apr 22, 2011

Nem Nướng - Vietnamese Grilled Pork Skewers

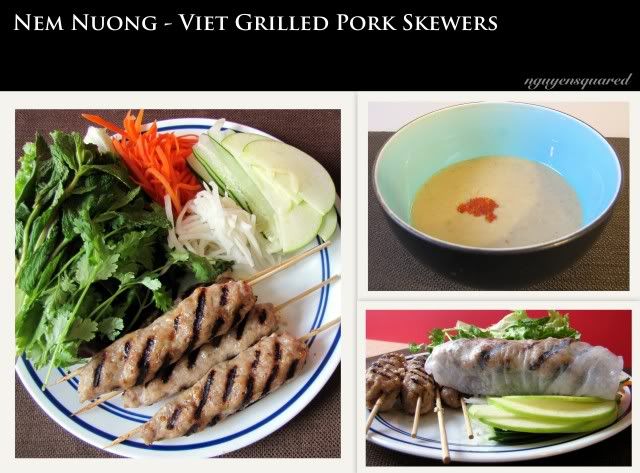
I think Vietnamese are obsessed with rice papers, we can wrap almost anything in rice papers, and then dunk them in sauces before savoring them. Many of these wraps have special names by which Vietnamese identify ingredients as well as methods of cooking. Nem nướng is one of them and it happens to be one of my favorites. 

Rumor has it that nem nướng originates from Khanh Hoa, a province along the central coastal area. I don't know when nem nướng migrated to my hometown nor do I remember my first time eating it but I do know I have always loved this dish. Later on, people added served fried rolled rice papers along to create a crunch when you bite into the wrap. I personally have never been a fan. Plus, the fried rice papers tend to be overly oily. I also learned later that in some areas, these fried rice papers also contain tiny shrimps.

When I was still at home, this was something we only got during special occasions because it wasn't cheap. (I don't know why we never made it at home hmm.) Then I went away for school and whenever I came back for a visit, my family always made sure I got to eat it at least once before I left again.

I have never eaten nem nướng anywhere else in Vietnam. I'm funny that way. I can be adventurous enough to try completely new cuisines but when it comes to some dishes that I dearly love, I only want to eat them at places that I always eat at. I fear eating them somewhere else would spoil the whole thing for me. Of all the years I have been in the US, I only ate nem nướng once and it was ok, not outstanding. It is also in the US that I learn nem nướng could be served with vermicelli as a noodle dish or as filling in Vietnamese sandwiches. In Vietnam (or at least in my hometown), it is exclusively served on its own, wrapped in rice papers with lettuce and herbs.

I often craved for the nem nướng I can get in my hometown. That is, until I tried making it for the first time ;) I don't know if I've gotten so used to my own cooking or if the quality of nem nướng at my fav store back home has gone down the hill over the years but now it's no longer the first thing I want to eat once I get home.

To be honest, the recipe I'm going to write down below is still just an approximation because I do a lot of tasting and modifying along the way that I tend to lose track of how much of what has been added so please bear with me. I have to say that it took great self-discipline from me to take the photos you see here. The moment I was done grilling my skewers, all I wanted to do was sitting down and devouring them. But for the sake of my readers (I don't know if you actually read but I assume you do, just for my ego's sake), I tried so hard to pretend my nostrils weren't under attack by General Aroma. So here it is:

Photobucket


INGREDIENTS:
Make about 6-8 servings

For the meat:
2 lbs ground pork*
1 medium onion
6 cloves garlic
2 Tsp honey
2 Tsp corn starch
4 Tsp fish sauce
1 Tsp fresh ground white pepper
Skewers, soaked overnight
Roasted rice powder (optional) 

Pickled carrots and daikon (recipe at the end)
Green/red leaf lettuce
1 cucumber, thinly sliced lengthwise
2 granny smith apple, thinly sliced**
Herbs: cilantro, mint, Viet basil, chives, etc.
Rice papers

For the dipping sauce:
1/3 cup mung beans
1/3 cup glutinous rice
1 Tsp oil
1 large clove garlic, finely minced
11/2 Tsp peanut butter
Sugar
Salt
Fermented soy bean paste (Tuong Cu Da) (optional)
Some ground pork (optional)
Annatto seeds (optional)


** Back home, this dish is served with sliced star fruit and young banana. I find granny smith apples to be a wonderful substitute for star fruit.


METHOD:
To make the meat skewers:
*I find that the ground pork available at grocery store contains too much fat so I normally get half ground pork and half lean pork and then grind it myself at home. It's healthier this way. However, the downside is that the pork is less juicy and so I make up for that with the onion. 

Process the ground pork, onion, and garlic together. Transfer to a bowl. In a small bowl, mix together the corn starch, honey, pepper, and fish sauce. Add this mixture to the ground meat and mix well. (I have a strong suspicion that the owners of many nem nuong places in my hometown add food coloring to the marinade too because I can't seem to be able to reproduce the color. But it could just be my lack of skills, who knows.) At this point, I normally heat a small non stick skillet to cook a bit of the meat mixture to see if it tastes good. Marinate overnight in the refrigerator. You can get away with marinating it for a few hours but I find that it's best left overnight.

Form the marinated meat into sausages about 4in long and put the skewers through. (Here you have the option of making really thin skewers so that you can just pull one off and place in your roll later or form slightly larger ones then slice lengthwise later. I find slicing my grilled pork lengthwise makes it easier to wrap as there is a flat edge.) Cook the skewers on a bbq or broil in the oven. Broiling tends to make the meat drier. My solution (as I don't have an outdoors bbq) is to use a griddle over my gas stoves. To prevent sticking, lightly brush the skewers with oil before cooking. 

To make the dipping sauce:
Soak the mung bean and glutinous rice in water for about 30min. Cook until tender. If you are lazy, you can cook both together. Transfer the cooked rice and beans into the blender (but do not add too much water), add peanut butter and process until smooth. In a sauce pan, heat the oil on medium heat. If you prefer some color in your dipping sauce, bleed the annatto seeds in the hot oil. Remove the seeds. Add the garlic and cook till fragrant, about 30s. Add the ground meat if you choose to use it. Fry and stir constantly to break up the meat into tiny pieces. Add the bean and rice puree. Lower the heat, add the soy bean paste and season with salt and sugar to taste. (Sometimes I season the dipping sauce with condensed milk in place of sugar.) Stir constantly to prevent burning. Cook for about 2-3 min. The sauce should have the consistency of a creamy soup. Remove from heat. 

Serve the grilled pork skewers with vegetables. Provide a large bowl of water for guests to soften the rice papers. Place the vegetables on a corner of the rice paper, fold 2 sides in, roll while keeping a tight hold on the paper. Before getting to the end of the paper, place the grilled pork and continue rolling. You may want to place the pork together with the vegetables but your roll won't look as appetizing ;) There is no trick to making wraps/rolls except the one simple-but-hard-to-follow rule: do not, and I repeat, DO NOT, put too much on your rice paper.

Enjoy!!!


To make the pickled carrots and daikon:
Pickled carrots and daikon are found in many Viet dishes. The size of the pickles vary from dish to dish but the principle is the same. For this dish, you want your pickles to have somewhat a prominent presence so julienne both carrots and daikon. Here, the largest size of a mandolin slicer is perfect. (To serve pickles in vermicelli, for example, you want smaller cuts, i.e. medium size on the mandolin slicer.) You might find that daikon has too strong an aroma. What I do with it is that I mix the julienned daikon with salt and let it stand for about 30min. I then rinse the daikon well and then squeeze out as much liquid as I can before putting it into my pickling liquid. 

To make the pickling liquid: mix together one part rice vinegar and 1 part sugar. Place the carrots and daikon in a container, pour the liquid over the carrots and daikon. Cover and refrigerate. This keeps for at least a week. I can't tell if it's good for a longer period since I always finish it before the week is over. 

Apr 17, 2011

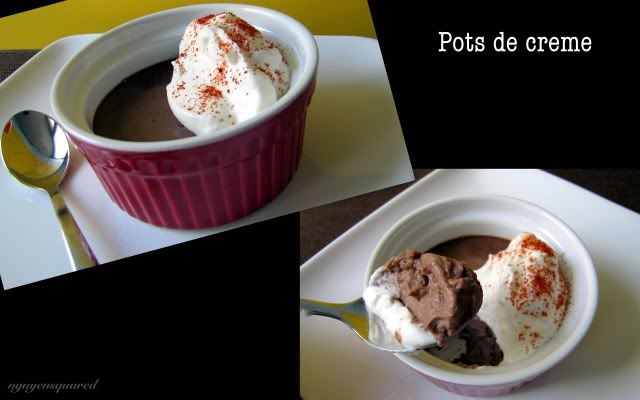
Pots de Crème with White Chocolate and Cayenne Pepper Whipped Cream

I was inspired by what chef Robert Irvine did in the elimination round of Chopped All Stars when he was up against chef Anne Burrell. Well, I was rooting for chef Anne (something about her attitude in the kitchen is just so gripping) but chef Robert's dessert looked so good I almost licked my tv screen. Sigh!!! For those not familiar with the show, every chopped episode starts with 4 chefs. They are asked to first make appetizer, then main course, and finally dessert. After each round, one is "chopped" so that at the very end there is one winner. The twist is that they have to use all the mysterious ingredients that are given to them for each round. Anyway, I can't remember exactly what were in the basket when dessert round came. All I can remember is the end product: small, cute, and certainly mouth-watering pots de crème. Chef Robert created a twist when he added ground black pepper to the whipped cream. After watching that episode, I swore I'd make pots de crème soon. And I thought about adding cayenne pepper instead. I'm pretty sure people have done this before but hey, I didn't look it up in a recipe book or on the internet so I'm just going to claim that it's my creation for now ;)

The "problem" with pots de crème is that they are extremely rich and I wasn't going to make a multitude of them and then eat them all by myself so I was patiently waiting for a chance. And then came 2 willing guinea pigs, I meant lunch guests. So I made nem nướng, Vietnamese skewered pork wrapped in lettuce and herbs, and served with peanut-based dipping sauce (recipe to follow soonish, I promise) and pots de crème for dessert. So here it is:

Photobucket

INGREDIENTS:
Make about 8 servings

For the pots de creme:
3 oz bittersweet chocolate, chopped
2 cups heavy cream
1/2 cup milk
5 egg yolks
1/4 cup granulated sugar
pinch of salt

For the whipped cream:
1.5 cup whipping cream
2 oz white chocolate
Cayenne pepper

METHOD:
Place rack in the center of the oven, preheat oven to 375 degrees F.

In a large bowl, melt the chocolate over gently simmering water. Remove from heat and set aside.

Heat the milk and cream in a saucepan over low heat until the mixture is about to boil.

In a medium bowl, whisk the egg yolks, sugar and salt until the sugar dissolves completely. Temper the egg mixture with the cream. (See, I'm learning the lingo here.) That is, add the cream mixture very slowly to the egg mixture while whisking constantly. This is to prevent the hot cream from cooking the eggs.

Now, add the egg+cream mixture slowly over a strainer to the chocolate. Keep whisking constantly.

Ladle the chocolate mixture into 8 6oz ramekins (or specialized pots for pots de creme).

Line the bottom of a baking pan with paper towels. Place the filled ramekins over the towels, add hot water to the pan so that it reaches about halfway up the sides of the ramekins. Cover the entire pan with foil.

Carefully place the pan onto the rack and bake until the mixture around the edges of the ramekin is firm when slightly shaken. (This takes about 30-35 min but it depends on your oven temperature and the thickness of your ramekins.) It's okay if the middle still jiggles. Carefully remove the ramekins and let them cool. Once they have cooled down, chill them in the fridge for 2-3 hours.

Melt the white chocolate, let cool to room temperature. Whip the whipping cream in a chilled bowl until soft peaks are form. Fold in the chocolate and whip till stiff peaks are formed. If you are willing to try whipped cream with cayenne pepper, add about 1tsp of cayenne pepper near the end of the whipping process.

Serve the chilled pots de creme with a spoonful of whipped cream on top. Bon appetit!!!

I have a feeling fine fleur de sel (or bacon bits if you are feeling even more adventurous) would make a great variation for the whipped cream topping too!

Apr 15, 2011

Crêpes, oh crêpes

I first learned to make crepes when I was in primary/grade school. It was a rare treat for poor kids like us. My grandmother would make the batter (she told us she had learned that while working as a cook for some French people) and I would be allowed to make the crêpes. My uncle would cut about 8in off a banana leave stalk (we still had banana trees in our garden then) and split one end into strips. That would be my disposable oil brush. Some creativity there!!!! At the time I thought what my grandmother said was something to humor a kid who didn't have access to fancy food. And French food always sounds uber fancy!!! I mean how could something so simple be ... French? During my junior year in college, I spent a semester abroad in Paris and crêpes almost became a daily ritual. Who could resist 3.5-4 euros deals of 1 panini and 1 nutella crêpe, right? Sure they were so much bigger, and richer with butter but they taste very much the same as the ones my grandmother taught me to make. I'm still amazed by the fact that I didn't put on weight at the end of the semester given the amount of starch I consumed during those months!! Oh I know why, that was because my host mom kinda starved us when dinner came! That's another story for another time perhaps.

One thing that annoys me (I'm picky I know) is that many people (especially Americans) say something like "oh crêpes, you mean the French pancake?" and I'm thinking in my head (well, sometimes what I think in my head makes its way to my mouth too) "what the heck!!" I mean, sure, they both contain egg, milk and flour but they are definitely not the same! While pancakes rely on your not overmixing the batter and baking power and baking soda to become fluffy, the batter for crêpes does not use any baking soda/powder and requires thorough mixing for they are so much more delicate.

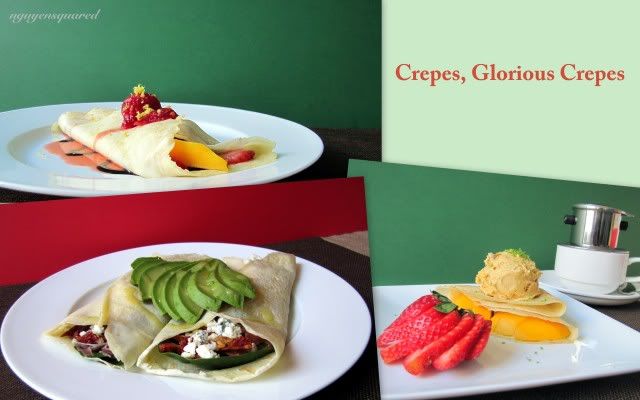
I actually don't make crêpes very often since I can't finish 12 crepes in 2-3 days even though I do like them very much. But since mangoes were on sale, I thought they would make great filling for crepes ;) and that turned out to be true. So here you are

Photobucket

I think I saved this recipe after watching the Good Eats episode in which Alton Brown was making crêpes.


INGREDIENTS:
Make about 12 crêpes

2 large eggs
3/4 cup milk
1/2 cup water
1 cup flour
3 Tsp melted butter
Butter, for coating the pan

*For sweet crêpes: Add 2Tsp sugar and 1tsp vanilla extract
For savory ones: Add 1/4 tsp salt and your favorite chopped herb(s)

METHOD:
In a blender, combine all the ingredients and pulse until very well mixed. This doesn't take too long, probably about 10-15s.

Chill the crepe batter for 1h. This gives the bubbles time to subside and crepes will be less likely to tear during cooking. The batter is good for up to 48h.

Heat a non-stick pan. Add butter to coat. Pour 1 ounce of batter into the center of the pan and swirl to spread the batter evenly. Cook for 30s and flip. Cook for another 10s and remove to a cutting board to cool. Repeat until the batter is finished. Once the crêpes have cooled down completely, they can be stacked and stored in a resealable plastic bag in the fridge for a few days or in the freezer for up to 2 months. (I put a layer of plastic wrap in between 2 crepes while stacking, parchment paper works just as well.) Frozen crêpes should be thawed on a rack completely before use. 

Bon appetit!

*If you are indecisive like me, you could do what I did. I added the vanilla extract and 1Tsp sugar. This way I could use my crêpes for both sweet and savory fillings.

For a healthy serving: add strawberries (or any kind of berries really) macerated in 1Tsp sugar and lemon zest and lemon juice.

For a more indulgent version: add your favorite homemade ice cream or whipped cream or whatever else you fancy.

I filled my savory crepes with spinach (quickly tossed in a dressing of extra virgin olive oil, lemon juice, honey and Dijon mustard), prosciutto torn into small pieces, sliced sun-dried tomatoes and crumbles Gorgonzola. The sweetness from the dressing balances the saltiness from the prosciutto and cheese well, yummy!!!!

Apr 14, 2011

Mango Ice Cream

Mangoes were really cheap last week so I made a bunch of desserts with mango: Thai sticky rice with mango (recipe to follow soon), crêpes with mango filling, and last but not least mango ice cream (which I then served with crêpes for a mango overload ;).

Making ice cream at home is fun and you can certainly control the amount of sugar that goes into the ice cream. I often find the store-bought ice cream to be too sweet for my taste. On top of that, the amount of preservatives is significantly reduced. (Here I'm guessing that there are some preservatives in whipping cream already.) The downside is that you have to put aside some space for your ice cream maker, and if you find yourself making impromptu ice cream often, then you also need to put aside some freezer space to store your cooler "permanently".

There are very few ingredients that go into this recipe. The outcome is awesome for any mango-lover out there.


INGREDIENTS:
For the caramelized mango:
1/3 cup raw sugar
1 mango (11/2 if the small ataulfo mangoes are used)

For the ice cream:
2 mangoes (3 if small ones are used)
1 lime
1/3 cup sugar
1 Tsp molasses
Kosher salt
1 pint heavy cream

METHOD:
Peel the mangoes, remove pits, and cut into dice. Heat the raw sugar in a skillet on medium heat, swirl the sugar around often. Once the sugar has completely melted, add the mangoes and stir. Scrape the mangoes into a bowl, cover, and chill.

Peel the other 2 mangoes, remove pits, and give them a rough chop. Process the mangoes in a blender until you get a puree, add the zest and juice from the lime, molasses, sugar, and salt. Pulse until sugar is dissolved, about a minute. Scrape the puree into a container, whip in the cream, cover, and refrigerate for at least 8hours, overnight is best. If you prefer seeing the lime zest in the ice cream, whisk the zest in with the cream instead.

Freeze the ice cream base according to the instructions for your ice cream maker. When the ice cream is almost done, as in the caramelized mango. Wait till the ice cream is firm. Remove and freeze for at least 2 hours before serving.

And voilà, this is a small portion of what you get:

Photobucket

Spring is here, the weather is warming up, it's the perfect time for some homemade ice cream. I guess peaches would make wonderful substitute for mangoes too. Yum!!!

Bún Bò Huế - Hue Spicy Beef Noodle

It is hard for most Americans to distinguish Bún Bò Huế (BBH) and Phở since they are both translated as "beef noodle", but they are as different as day and night, or as some wise person once said on her blog: "to say BBH and phở are the same is like equating spaghetti bolognese and fettuccine alfredo." The only thing BBH and phở share in common is beef.

BBH, as the name suggests, originates from Huế, a beautiful city in the central area (which I have not had the good fortune to visit). Hue is famous for many other different small-portioned dishes that I hope to share with you some time soon. Hue cuisine is stereotyped to be spicy. However, many of Viet dishes can be made as mild or as spicy as you prefer without losing their flavor.

I am not absolutely sure if what I'm going to show you is indeed Bún Bò Huế according to Huế people. I think it is so say that this is Bún Bò Huế that my family often make.

Photobucket

In Dalat, BBH is served with bean sprouts, a mixture of escarole and herbs (such as Viet basil, red perilla, Vietnamese balm) thinly sliced, and occasionally thinly sliced banana flower (left photo). I think Dalat is the only place in Vietnam where most soupy noodle dishes are served with thinly sliced escarole. Perhaps because we grow a lot of escaroles. In Saigon, BBH is often served with sliced banana flower, shredded water spinach stalk, and herbs (as demonstrated on the right photo). In the US, BBH comes with shredded red cabbage. Whatever your preference, it is the herbs that enhance the flavor of the soup.

Like many other Viet dishes, the work is in making the broth. It often takes 2-3 hours for the bones to release all their flavor into the stock. Pressure cooker certainly speeds up the process but the end result is not quite the same. Or perhaps it's a psychological thing!

INGREDIENTS:
For the broth:
2 lbs beef/pork bones
1 front pig's feet, cut into rounds (this is often pre-done at Asian grocery stores)*
11/2 lbs beef shank
8 lemongrass stalks  (2 for mincing, optional)
1 large onion
2 Tsp mắm ruốc (shrimp paste)**
Viet fish sauce (3-crab brand is recommended)
1 Tsp sugar
Curdled pig's blood (optional)
Vietnamese steamed pork loaf (I prefer Hue style pork loaf)


Others:
Bean sprouts
Your preferred way of serving vege as mentioned above***
Spring onion + cilantro
Lime wedges
Onion
Freshly ground pepper
Jiang Xi round noodles, large

METHOD:
Bring water (enough to cover the bones) in a stock pot to boil, place the bones and pig's feet in. Let boil for about 10 min. Remove from heat, dump the water from the pot, wash the pot (or use another stock pot) and the bones then put the bones back into the pot and boil. This is to remove all the scum that has floated to the top. Once the water boils again, you will find more scum floating to the top, use a fine strainer to remove it.

Bruise 6 lemongrass stalks with a knife and place them together with the onion into the pot. Add the shrimp paste. Turn heat down to low and let the pot boil for about 2 hours. At about 1.5h, add the beef shank.

While waiting for the stock, prepare the vege for serving and noodles. Bring water to boil in a sauce pan, put the noodles in. Once the noodles are softer than al dante, remove, place under running cold water and strain.

At the end of the 2h, remove the pig's leg rounds and beef shank ,and set aside for serving later. Discard the bones. Add the 1Tsp sugar. Taste to see if the broth is salty enough. Chances are you will need to add fish sauce at this point. 

Heat a 2Tsp of oil on a frying pan, add the annatto seeds and cook until the seeds have bled all of the oil. Remove the seeds. My family just add this to the broth for color. Some places saute the minced lemongrass in this oil for 2-3 min before adding the mixture to the stock pot.

When the beef shank has cooled fown, slice them into 1/10in-thick slices.

Cut the pork loaf and curdled pig's blood into 1-in thick pieces. Add these together with the annatto oil to the pot, let boil on low fire for a few minutes.

Put strained noodles into bowl, arrange 1 round of pig's leg, a few slices of beef shank, 1-2 pieces each of pork loaf and curdled blood. Top with sliced onion, spring onion and cilantro. Ladle soup over the noodle, add freshly ground pepper on top and serve with vege.

Enjoy!!!

*You may opt not to use pig's leg but it makes the dish less authentic.
**Shrimp paste refers to many kinds of pastes made from shrimp due to the lack of English words to accurately translate these Viet condiments. Make sure you get mắm ruốc or the flavor would be completely off.
***If banana flower is used, prepare a bowl of cold water with a few Tsp of vinegar added to it before you slice the banana flower. Separate the purple leaves, remove the actual flower, slice these leaves very thinly. Once they are sliced, place immediately in the bowl to prevent oxidation/browning.

To shred water spinach stalks, get a tool specific for this task from a Viet/Asian grocery store. It's inexpensive.

Apr 13, 2011

Chè Thưng, a Vietnamese Dessert

I thought I should have a post on something Vietnamese before I'm accused of being an impostor ;) So what better than a Vietnamese dessert, right?

In general, chè, translated to English as "sweet soup", is a term used to describe many desserts in Vietnam. Don't let the word "soup" fool you, many of these desserts have the same texture as, I should say, chowder. When I was young, my aunt used to take me with her when she went to the market. Sometimes I would be rewarded with a "bag" of chè from one of the mobile "stores", like in the photo below:

Photobucket

(This photo is taken from a Viet film. In real life, people who sell chè are often old(er) women and not young pretty girls like it is portrayed here.) I often couldn't wait till I get home before devouring it. I would bite a little hole off the bag and squeeze the chè out ;) while sitting on the back of my aunt's motor scooter. The drive home probably lasted about 5' but I always finished my chè before I even got home.

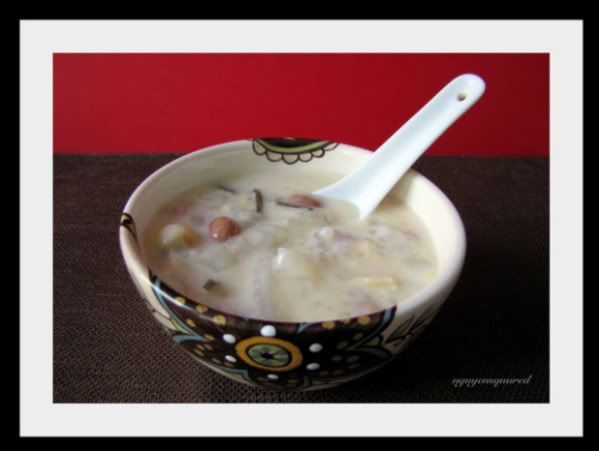
Chè is just as diverse as savory dishes as one travels across the country. Most chè in Saigon, for example, are served with shaved ice due to the warm weather, while many types of chè in Dalat, my hometown, are served warm/hot. To be honest, my being Vietnamese certainly does not imply my being well-versed in Vietnamese cuisine, especially northern cuisine. So I'm not even going to try telling you about chè in the north. But what I'm going to do in this post is giving you a recipe of a southern chè. I have to say that this was produced from memory and I tried my very best to keep track of the amounts of each ingredient that goes into this dessert.

I did a google search before attempting this dish as it has been a while since I last had it and wasn't quite sure what goes into it. What I found was that there are quite a number of posts in English that say this is "Vietnamese bo bo cha cha". Well, bo bo cha cha is a Singaporean/nonya dessert that is more a cousin of chè bà ba (another Viet dessert) than chè thưng. For example, chè thưng should not contain sweet potato and yam/tapioca. Or maybe I have been fooled all my life by the chè thưng I eat in my hometown. Oh well! Anyway, without any further ado, here it is:

Photobucket

INGREDIENTS:
Overnight soaking, active time: ~1h, total time:~3h
Make about 6 servings

1/2 cup peanuts
1/3 cup dried lotus seeds
1/3 cup split mung beans
1/4 cup tapioca pearls
1/3 bag tapioca strips
2 cups water
1/2 cup + 1Tsp sugar
Shredded kelp (either fresh or dried)
6oz (or more) coconut cream
1/2 bunch washed pandan leaves (if not available, vanilla extract maybe used)


METHOD:

Soak the peanuts in water overnight, then boil until soft. (This will take a while, be patient). Strain and put aside.

Soak lotus seeds and mung beans in water for about an hour. Make sure you remove the stems inside the lotus seeds, otherwise it will be bitter. Cook these separately till they are soft. Strain and put the lotus seeds aside. Be careful with the mung beans as they burn easily, it's best to cook them on low heat. Once the mung beans boil, remove bubbles on top. Once they are done, remove most of the water.

Soak the tapioca strips for about 10min and follow the instruction here to separately prepare the tapioca pearls and strips. The strips should be allowed to boil for a few more minutes before heat is turned off. Strain and set aside.

If using fresh kelp, bring some water to a strong boil, put the kelp in and let it cook for ~2min, remove from heat, wash under cold water and place in an iced bath to stop the cooking. Otherwise, you will get very mushy kelp. Cut into 2in strips. If using dried kelp, soak it in warm water, then wash under cold water and then cut into strips.

While waiting for the mung beans to cook, put water, sugar and pandan leaves in a 3-4 qt pot on low heat and bring to a soft boil. Stir occasionally to make sure the sugar is dissolved. Once sugar is dissolved, let the mixture cook for another 20min or so to allow the syrup to absorb the pandan flavor. Once done, remove the pandan leaves. Add the peanuts, lotus seeds, and mung beans into the mixture, stir. Add the coconut cream, mix well. Make sure the mixture is not too thick, or you will have to add some more water and sugar if necessary. Once the coconut has blended in completely, add the tapioca pearls and strips, and the kelp. Let cook for another minute or so.

This dessert can be served warm on a cold day, or chilled or with shaved ice on a warm day. Bon appetit!

Apr 10, 2011

Spicy Chicken-Salad Lettuce Cups

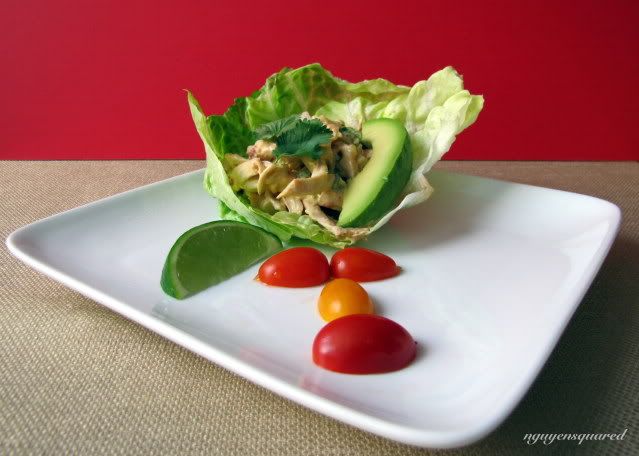
This is one quick and easy recipe, and the leftover makes great filling for sandwiches. It's adapted from the Spicy Asian-Chicken-Salad Lettuce Cups by Melissa Rubel Jacobson and featured in Food&Wine annual cookbook 2010. I don't think this is quite an Asian salad, at best it's fusion since Asians generally do not use mayonnaise and dijon mustard.

Photobucket

INGREDIENTS:
2 Tsp mayonnaise
2 tsp sambal oelek (replace with sriracha for more bite) or to taste
1 tsp Dijon mustard
1/2 tsp Asian sesame oil
1 pound grilled chicken, pulled into pieces
1/3 cup chopped jicama (the original recipe calls for water chestnuts), diced
2 spring onions, both white and green parts, thinly sliced
Kosher salt and freshly ground pepper
12 Boston lettuce leaves
1 Hass avocado, peeled and cut into 12 slices
Lime wedges

METHOD:
In a medium bowl, mix the mayonnaise, chili sauce, mustard, and sesame oil together.

Stir in chicken, jicama, and onions. Season with salt and pepper.

Spoon the salad into the lettuce leaves and top with a slice of avocado. 

Serve with lime wedges.

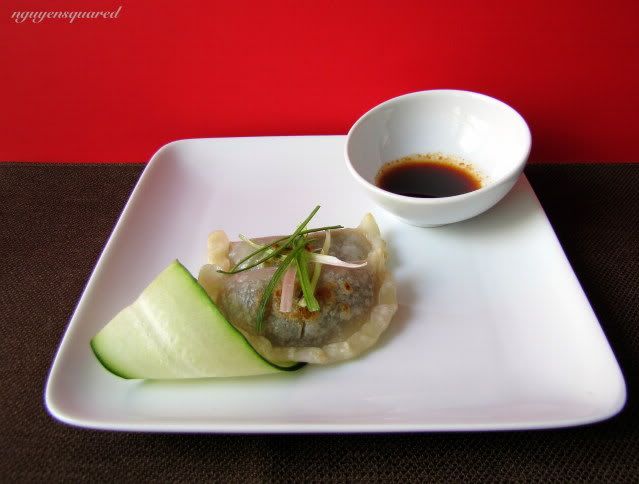
Chive Dumplings

Chive has not always been my favorite leaves. When I was young, I sweated profusely every night. Somehow, through words of mouth, my family thought that chive "essence" would be the cure. My grandmother would steam/cook chives in some way that still remains mysterious to me till this day. Then, also by some mysterious means, she produced a small glass of chive juice. My job was to down it. You know, kids never like doing what they are told. I was no exception, especially when chives do have a fairly strong fragrance (mind you, Vietnamese chives make the American counterparts seem so mild). But I did drink cups of chive "juice" anyway. (I was a very well-behaved child ;) ) I'm not sure if that helped or if I grew out of that phase but I no longer woke up drenched in sweat.

Anyway, I later grew out of my hatred for chives. In fact, I learned to love them. I love them in this Vietnamese "soup" that consists of ground pork, chives, and tofu cubes. I love them stir fried with bean sprouts and curdled blood cubes. (Okay you can run screaming now!) And I especially love them in dumplings. The other day I had a craving for these dumplings and decided I'd keep my words of eating in. So I made them instead of taking the bus and train to Chinatown. I downed those few too quickly for any photos to be taken but I froze the rest so that there's a photo today.

Photobucket

INGREDIENTS:
For the dumplings:
Make about 12 dumplings

1/4 cup tapioca flour
1/4 cup sticky/glutinous rice flour
1 cup rice flour
1/2 cup water
1 Tsp soy sauce
2 cups green chives (more if you use American chives), sliced
2 tsp+ oil
For the dipping: 
2 Tsp vinegar
1 Tsp honey
1 tsp soy sauce
1 tsp dark sweet soy sauce
Sriracha chili sauce (optional)

METHOD:

To make the dumplings:
Add rice flour, sticky rice flour, and water to a pot over low to medium heat. Stir constantly to prevent sticking. If the mixture dry out or become too sticky too quickly, lower the heat. Add more water slowly if needed. Keep stirring until the mixture turns "gluey".

Remove the pot and add the tapioca flour. Mix until a dough consistency is achieve. Let it cool.

Meanwhile, heat the oil in a pan over high heat. Add the chives and soy sauce and immediately remove from heat. Overcooking will produce too much water.

Check to see if the dough is too sticky. Add more tapioca if needed. Take a portion of the dough and roll to get approximately an 1-in ball. Use your fingers to turn the ball into a flat disc. Put cooked chives in the middle, fold one side over to seal. You might one to fold the edge in a little to make a tight seal.

Steam the dumplings for 5-7 minutes, until the dough is cooked. You should be able to see the green chives inside. Now, you have the option of serving them steamed or searing them for a bit before serving.

To make the dipping:
Mix everything together.

Bon appetit!

Apr 6, 2011

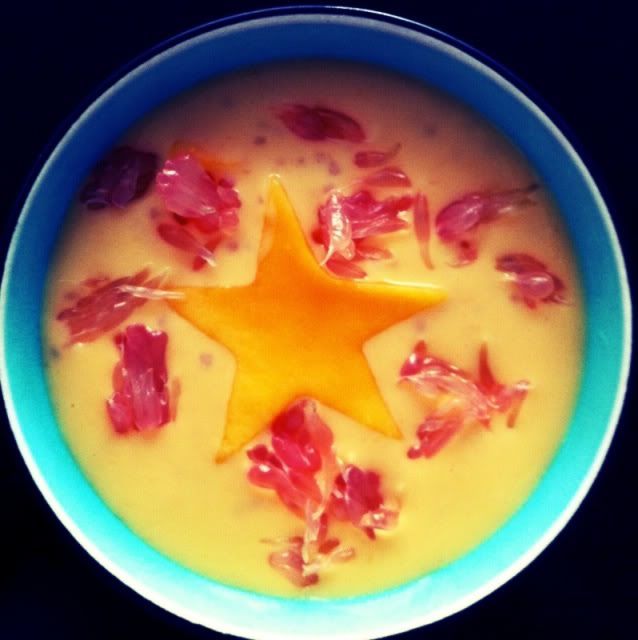
Mango Sago

Being Vietnamese, I absolutely love all kinds of tropical fruits but they are hard to find in the US. I am also partial to the extremely sweet, soft, and sticky (sss huh??) mangoes instead of the somewhat more crunchy ones that are more easily available at US grocery stores. Lucky for me, right now ataulfo mangoes are in season. The other day I bought a few and decided they were ripe and sweet enough for one of my favorite Singapore's fruit desserts: mango sago.

While living in Singapore, I first had mango sago at a dim sum restaurant called Lei Garden (they have amazing char siu pau by the way). I am a strong believer in love-at-first-bite and this was one of those situations. After that first encounter, I'd always make sure to leave room for it every time I had dim sum there. Then one time when I went back to Singapore, my friend took me to a dessert/snack place in Chinatown and I discovered that their mango sago was even better. That new place (whose name I don't know) becomes a must-visit on my list every time I go back.

This dessert is easy to make, and is wonderful for a hot summer day. I won't blame you for gulping it down on a cold winter day either, I promise!!

Photobucket

MANGO SAGO RECIPE
Makes 4 servings

INGREDIENTS:
1/4 cup dry small tapioca pearl
6oz evaporated milk
2 medium, ripe ataulfo mangoes
Chinese red pomelo (in desperation blood orange or pink grapefruit would probably make a decent substitute)
~ 11/2 cup mango juice (I used Ceres mango + pear juice)
Sugar (optional)

METHOD:
Cook the tapioca. To avoid overcooking, try this: bring water in a small sauce pan to boil, pour the pearls in, let boil for a min, turn off the heat, cover. 20 min later check to see if the pearls has become translucent. If not, bring the pot to a boil again, then turn off the heat and cover. As soon as the pearls turn translucent, rinse them with cold water to stop the cooking process. Strain and set aside.

Peel the pomelo, take care to remove all the white "skin" so it's not too bitter. Break them into small block of "cells".

Peel the mangoes, dice one of them into small 1/4in cubes, cut up the other to blend later.

In a blender, process the cut mango pieces, evaporated milk and 1 cup of mango juice until smooth. If the mixture is too thick, add more mango juice. If your mangoes and mango juice are not too sweet, you might add 1 or 2 Tsp sugar here.

Transfer the mixture into a bowl, add tapioca pearls, mix together, then chill in the fridge.

Before serving, mix the pomelo in. Distribute the mixture into bowls and top with more pomelo and cute shapes made from mango slices.

Enjoy!!!!!