A while ago a friend of mine sent me a link to David Lebovitz's blog post on chocolate buckwheat cake when she knew I had started on experimenting with gluten free baking. I quickly read the post but decided that it could wait for another occasion. Then I was invited to my usual quarterly dinner and was charged with the task of bringing dessert. Ha! Perfect opportunity to test a new recipe. I have to put it out there that these people are always willing to be taste testers for me. I am not sure if that is a wise choice on their parts but it works great for me.
DL said on his post that this is a modification from a recipe he found in a cookbook by the blogger at Canelle et Vanille. I am not sure what kind of modifications he made since I don't own a copy of said cookbook. But I followed his recipe and it turned out wonderfully, don't you agree?
I happen to think that this cake is great whether your guests are celiacs or not. I know people can be skeptical. Why would you want to bake something gluten free if you don't have to? Well, I guess DL is right is saying that the fact that it has buckwheat is good enough a reason for you to try this recipe at least once. So if I have not managed to convince you to go try it, the short list of ingredients should, right? I promise it is very very simple.
INGREDIENTS:
6 oz bittersweet chocolate
1/2 cup unsalted butter, cubed
4 large eggs, separated
1/2 cup sugar in the raw*
1/3 cup whole milk yogurt
1 tsp vanilla extract
1/2 tsp salt
3/4 cup hazelnut (or almond) flour**
1/4 cup buckwheat flour***
Extra hazelnuts, toasted and chopped
*Sugar in the raw enhances the flavor of chocolate. (Yeah, I just learned that too! After learning about that, I used sugar in the raw in my hot chocolate and it did taste better too :) ) But if you don't have it, regular sugar works too.
**I did not have any hazelnut flour on hand so I ground 1 cup of hazelnuts together with the buckwheat flour in a food processor until the mixture looked like nut meal. You could use the nuts as are or if you prefer, toast them for about 10 minutes and the skin will peal off.
***Buckwheat flour should be available at decent size grocery stores or at any health store.
METHOD:
Preheat the oven to 350 F. Butter an 8-inch cake pan and then line the bottom with a round of parchment paper. Or you could use a cake ring and place in on top of a piece of aluminum foil on a very flat baking sheet. Pull the extra foil up the side of the ring to prevent any possible leakage as the batter will be quite runny.
In a bowl large enough to contain all the ingredients set over but not touching simmering water, melt the chocolate and butter until smooth. Remove from the heat and let cool slightly.
In a medium bowl, whisk together the egg yolks, half of the sugar, yogurt, vanilla, and salt. Then whisk them into the melted chocolate. Stir in the nut meal and buckwheat flour.
In a separate bowl, whip the egg whites until they form soft peaks. Gradually whip in the remaining sugar until firm peaks form. Mix one third of the egg whites into the batter to lighten it and then gently fold in the remaining whites.
Scrape the batter into the pan, level the top, then bake for about 25 to 30 minutes, until the center of the cake is still soft but the cake is relatively set. Don't overbake as you want a soft cake. Let the cake cool on a rack for about 10 minutes then remove from the pan.
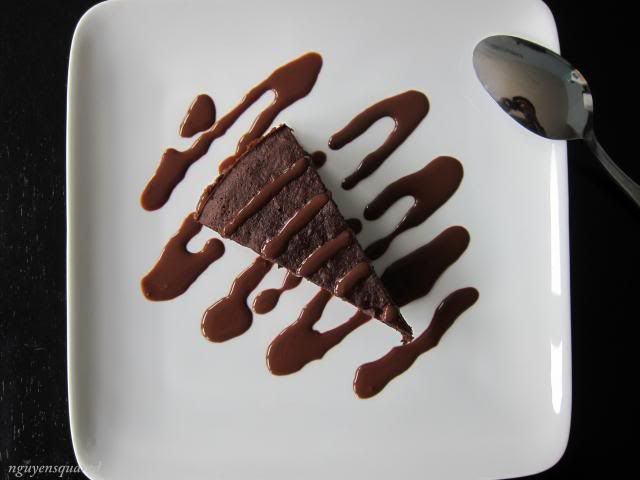
Serve the cake with some good ice cream or your favorite chocolate sauce, or both. If you don't yet have one, consider trying the following recipe.
CHOCOLATE SAUCE
4.5 oz bittersweet chocolate, finely chopped
1 cup water
1/2 cup creme fraiche or heavy whipping cream*
1/3 cup sugar
*The sauce is much better with creme fraiche. It's usually very expensive to get at a grocery store but you can make it at home but putting 1 cup of whipping cream in a clean glass jar, add a tablespoon of buttermilk. Cover with a lid and shake well. Leave it out on a counter for 12-24 hours until it thickens. It is now ready to be used or kept in the refrigerator for up to 2 weeks.
Place all the ingredients in a saucepan. Bring to a boil and reduce the heat to simmer. Stir constantly until the sauce thickens enough to coat the back of a wooden spoon. Serve warm or let cool completely and store in the refrigerator until needed. Reheat the sauce in a bowl over simmering water to warm it before serving.
DL said on his post that this is a modification from a recipe he found in a cookbook by the blogger at Canelle et Vanille. I am not sure what kind of modifications he made since I don't own a copy of said cookbook. But I followed his recipe and it turned out wonderfully, don't you agree?

I happen to think that this cake is great whether your guests are celiacs or not. I know people can be skeptical. Why would you want to bake something gluten free if you don't have to? Well, I guess DL is right is saying that the fact that it has buckwheat is good enough a reason for you to try this recipe at least once. So if I have not managed to convince you to go try it, the short list of ingredients should, right? I promise it is very very simple.
INGREDIENTS:
6 oz bittersweet chocolate
1/2 cup unsalted butter, cubed
4 large eggs, separated
1/2 cup sugar in the raw*
1/3 cup whole milk yogurt
1 tsp vanilla extract
1/2 tsp salt
3/4 cup hazelnut (or almond) flour**
1/4 cup buckwheat flour***
Extra hazelnuts, toasted and chopped
*Sugar in the raw enhances the flavor of chocolate. (Yeah, I just learned that too! After learning about that, I used sugar in the raw in my hot chocolate and it did taste better too :) ) But if you don't have it, regular sugar works too.
**I did not have any hazelnut flour on hand so I ground 1 cup of hazelnuts together with the buckwheat flour in a food processor until the mixture looked like nut meal. You could use the nuts as are or if you prefer, toast them for about 10 minutes and the skin will peal off.
***Buckwheat flour should be available at decent size grocery stores or at any health store.
METHOD:
Preheat the oven to 350 F. Butter an 8-inch cake pan and then line the bottom with a round of parchment paper. Or you could use a cake ring and place in on top of a piece of aluminum foil on a very flat baking sheet. Pull the extra foil up the side of the ring to prevent any possible leakage as the batter will be quite runny.
In a bowl large enough to contain all the ingredients set over but not touching simmering water, melt the chocolate and butter until smooth. Remove from the heat and let cool slightly.
In a medium bowl, whisk together the egg yolks, half of the sugar, yogurt, vanilla, and salt. Then whisk them into the melted chocolate. Stir in the nut meal and buckwheat flour.
In a separate bowl, whip the egg whites until they form soft peaks. Gradually whip in the remaining sugar until firm peaks form. Mix one third of the egg whites into the batter to lighten it and then gently fold in the remaining whites.
Scrape the batter into the pan, level the top, then bake for about 25 to 30 minutes, until the center of the cake is still soft but the cake is relatively set. Don't overbake as you want a soft cake. Let the cake cool on a rack for about 10 minutes then remove from the pan.
Serve the cake with some good ice cream or your favorite chocolate sauce, or both. If you don't yet have one, consider trying the following recipe.
CHOCOLATE SAUCE
4.5 oz bittersweet chocolate, finely chopped
1 cup water
1/2 cup creme fraiche or heavy whipping cream*
1/3 cup sugar
*The sauce is much better with creme fraiche. It's usually very expensive to get at a grocery store but you can make it at home but putting 1 cup of whipping cream in a clean glass jar, add a tablespoon of buttermilk. Cover with a lid and shake well. Leave it out on a counter for 12-24 hours until it thickens. It is now ready to be used or kept in the refrigerator for up to 2 weeks.
Place all the ingredients in a saucepan. Bring to a boil and reduce the heat to simmer. Stir constantly until the sauce thickens enough to coat the back of a wooden spoon. Serve warm or let cool completely and store in the refrigerator until needed. Reheat the sauce in a bowl over simmering water to warm it before serving.