Apr 20, 2013

Muhammara

Muhammara is a Middle Eastern spread that tastes amazing on anything bread-y. Yeah, I did just say that :). I was first "introduced" to this when I randomly picked a vegetarian panini from a neighborhood cafe called Z&H. I think I had consumed so much meat the few days before that I decided to skip meat that day. And since then, it's what I always order when I eat at that cafe. I could tell what the ingredients on the panini were except for that red tasty paste which I later learned was muhammara. And so I put "make muhammara" on my to-do list but of course I didn't get around to it until much much later on. It turned out to be really easy to make. Well, I guess I have to travel to the source of the cuisine to know if this is authentic but it sure tastes good!! No, better than good! So without further ado, ladies and gentlemen and everyone in between, may I introduce you to the recipe.

INGREDIENTS:

2 large red bell peppers
1/3 cup walnuts, lightly toasted and chopped
~2/3 cup (gluten free) breadcrumbs 
3/4 tsp salt
1/2 tsp red pepper flakes
4 tsp freshly squeezed lemon juice
1 heaping tsp ground cumin
2 large garlic cloves
2 tsp pomegranate molasses*
~1/3 cup olive oil

*Pomegranate molasses is called for and is available at some grocery or specialty store. If you can't find it, use maple syrup.

METHOD:

Turn on the broil function of your oven, place the peppers on a baking tray lined with aluminum foil. Broil the peppers until they blister on all sides, turn them a quarter around every time, about 2-3 minutes on each side. Remove the peppers and place them in a bowl, cover the bowl with a kitchen towel for about 20 minutes. Peel the skin off and seed them.

Mince the garlic and then mashed them into a paste with the salt using the back of a spoon or a mortar.  

In a food processor, place all the ingredients except the olive oil and puree them into a smooth paste. With the motor still running, add the olive oil. If you plan to serve the spread immediately, use 2 Tsp. If you want to chill it, add more olive oil. I usually add about 1.5 Tsp to the spread and then pour olive oil on top to keep the spread in the fridge/freezer. This recipe makes about 1.5 cups of this very yummy stuff.

 photo IMG_3223-001_zps3d920bd5.jpg

You can serve this as a spread with toasted pita triangles or as part of sandwiches. For some ideas, consider roasted eggplants or zucchini or portobello mushrooms, paired with caramelized onions and mild melting cheese, like this
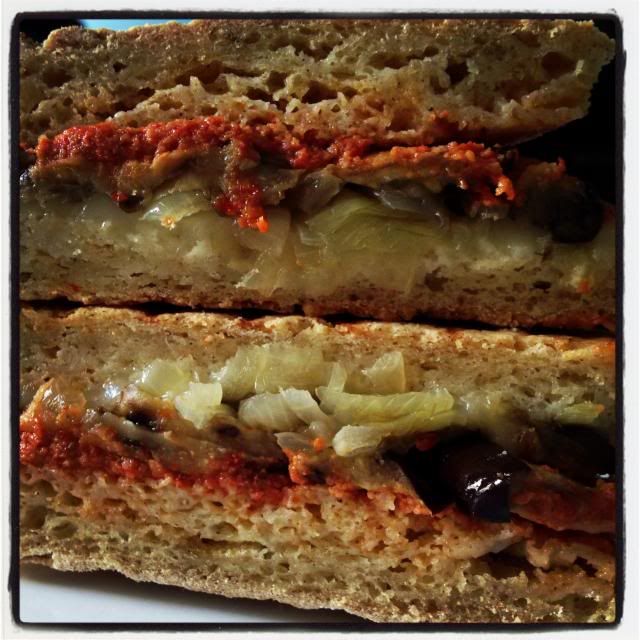
 photo photo1_zps75f16e07.jpg 

The possibilities are almost endless so have fun trying different combinations! Bon appetit! 

Mar 24, 2013

Chocolate Buckwheat Cake

A while ago a friend of mine sent me a link to David Lebovitz's blog post on chocolate buckwheat cake when she knew I had started on experimenting with gluten free baking. I quickly read the post but decided that it could wait for another occasion. Then I was invited to my usual quarterly dinner and was charged with the task of bringing dessert. Ha! Perfect opportunity to test a new recipe. I have to put it out there that these people are always willing to be taste testers for me. I am not sure if that is a wise choice on their parts but it works great for me.

DL said on his post that this is a modification from a recipe he found in a cookbook by the blogger at Canelle et Vanille. I am not sure what kind of modifications he made since I don't own a copy of said cookbook. But I followed his recipe and it turned out wonderfully, don't you agree?

 photo IMG_3155-001_zpsc8f2c615.jpg

I happen to think that this cake is great whether your guests are celiacs or not. I know people can be skeptical. Why would you want to bake something gluten free if you don't have to? Well, I guess DL is right is saying that the fact that it has buckwheat is good enough a reason for you to try this recipe at least once. So if I have not managed to convince you to go try it, the short list of ingredients should, right? I promise it is very very simple.

INGREDIENTS:

6 oz bittersweet chocolate
1/2 cup unsalted butter, cubed
4 large eggs, separated
1/2 cup sugar in the raw*
1/3 cup whole milk yogurt
1 tsp vanilla extract
1/2 tsp salt
3/4 cup hazelnut (or almond) flour**
1/4 cup buckwheat flour***
Extra hazelnuts, toasted and chopped

*Sugar in the raw enhances the flavor of chocolate. (Yeah, I just learned that too! After learning about that, I used sugar in the raw in my hot chocolate and it did taste better too :) ) But if you don't have it, regular sugar works too.
**I did not have any hazelnut flour on hand so I ground 1 cup of hazelnuts together with the buckwheat flour in a food processor until the mixture looked like nut meal. You could use the nuts as are or if you prefer, toast them for about 10 minutes and the skin will peal off.
***Buckwheat flour should be available at decent size grocery stores or at any health store.

METHOD:

Preheat the oven to 350 F. Butter an 8-inch cake pan and then line the bottom with a round of parchment paper. Or you could use a cake ring and place in on top of a piece of aluminum foil on a very flat baking sheet. Pull the extra foil up the side of the ring to prevent any possible leakage as the batter will be quite runny.

In a bowl large enough to contain all the ingredients set over but not touching simmering water, melt the chocolate and butter until smooth. Remove from the heat and let cool slightly.

In a medium bowl,  whisk together the egg yolks, half of the sugar, yogurt, vanilla, and salt. Then whisk them into the melted chocolate. Stir in the nut meal and buckwheat flour.

In a separate bowl, whip the egg whites until they form soft peaks. Gradually whip in the remaining sugar until firm peaks form. Mix one third of the egg whites into the batter to lighten it and then gently fold in the remaining whites.

Scrape the batter into the pan, level the top, then bake for about 25 to 30 minutes, until the center of the cake is still soft but the cake is relatively set. Don't overbake as you want a soft cake. Let the cake cool on a rack for about 10 minutes then remove from the pan.

Serve the cake with some good ice cream or your favorite chocolate sauce, or both. If you don't yet have one, consider trying the following recipe.

CHOCOLATE SAUCE

4.5 oz bittersweet chocolate, finely chopped
1 cup water
1/2 cup creme fraiche or heavy whipping cream*
1/3 cup sugar

*The sauce is much better with creme fraiche. It's usually very expensive to get at a grocery store but you can make it at home but putting 1 cup of whipping cream in a clean glass jar, add a tablespoon of buttermilk. Cover with a lid and shake well. Leave it out on a counter for 12-24 hours until it thickens. It is now ready to be used or kept in the refrigerator for up to 2 weeks.

Place all the ingredients in a saucepan. Bring to a boil and reduce the heat to simmer. Stir constantly until the sauce thickens enough to coat the back of a wooden spoon. Serve warm or let cool completely and store in the refrigerator until needed. Reheat the sauce in a bowl over simmering water to warm it before serving. 

Feb 10, 2013

Warm Chocolate Croquettes in Chilled Tapioca Soup

Happy Lunar New Year to those of you who celebrate! I hope you are eating like you should! I suppose I should be posting something Vietnamese and traditional but I don't always do what I should. Touche I know! So here is something I first made a long time ago but didn't take any photos. It's my playing around with Pierre Herme's recipe. Well, I wanted to stick to the original one but it's impossible to find passion fruits this time of year in this state, in this country! Also, I felt that the color of passion fruits makes the whole dish somewhat dull. So I used chunks of raspberries, and it looks much brighter, like this:

 photo bdc1e385-2106-4aa9-b5cc-8989c843cd49_zps44d6b1a3.jpg

I also followed his recipe the first time I made the soup, but realized that it was too rich, so I made some modification to it. Here's my version.

THE CROQUETTES

INGREDIENTS:
5 oz bittersweet chocolate, preferrably Valrhona Guanaja, finely chopped
1 stick unsalted butter
1 sliver habanero pepper (if you want some heat)
3 large eggs, 1 at room temperature
3 large egg yolks
1 1/2 Tsp sugar 
Very finely grated unsweetened dried coconut*

*Bob's Red Mill coconut flakes come in packages that say they are produced in facilities that contain gluten so if you are strongly allergic to gluten, make sure you get the GF coconut flakes.

METHOD:
Melt the chocolate in a bowl over simmering water. Keep the chocolate until it is warm to the touch.

Melt the butter, with the pepper, in a small saucepan. Discard the pepper and keep the butter.

Gently whisk together the room temperature egg, the egg yolks, and sugar in a medium bowl, try not to beat in air. Gently stir in the chocolate, then the butter. Refrigerate for at least 2 hours, until it is cold and firm. Once the ganache is cooled, it can be covered and refrigerated overnight.

Line a baking sheet with parchment paper. Beat the remaining 2 eggs in a small bowl. Pour the coconut into another bowl. Remove the ganache from the refrigerator and, using a spoon, scoop out enough to make a ball about 1inch in diameter. Make them too large and you won't get the warm, melting centers later. Dunk the chocolate balls into the beaten egg, then roll around in the coconut to coat it well, then place it on the lined baking sheet. Continue until you run out of ganache. There should be around 24 croquettes.  Place the sheet in the freezer for at least 30 minutes.  Set the beaten egg and coconut aside.

When the croquettes are set, give them another coating of egg and coconut. Don't skip this step or you might have chocolate melting into the hot oil later. Return them to the freezer for at least 30 minutes, preferably longer. Once frozen, they can be wrapped airtight and kept frozen in the fridge for up to 1 month.

THE GINGER CONFIT

INGREDIENTS:
1 knob of ginger, peeled.
2/3 cup water
1/2 cup sugar

METHOD:
Cut the ginger into thin strands. Bring the water and sugar to a boil in a small saucepan, add the strands of ginger, reduce the heat to the lowest setting. Cook the ginger for about 20 minutes. Cool, and pack in a covered jar.

THE TAPIOCA SOUP
Make 3 servings of 2 croquettes each

INGREDIENTS:
1cup whole milk
1 1/2 tsp sugar
1/4 tsp lime zest
1 1/2 Tsp tapioca pearls (in his recipe, PH calls for large ones, I had small ones at hand so I used them)
4 oz unsweetened coconut cream

METHOD:
Bring the milk, sugar, lime zest to a boil in a heavy-bottomed saucepan. Add the tapioca pearls, stir and bring the mixture back to a boil. Turn off the heat and cover for 15 minutes. Stirring occasionally. Bring the mixture back to a boil, stir, turn the heat off and cover for another 10 minutes. The pearls should be cooked by now. If you use large pearls, you might have to play with cooking time. Add the coconut cream. Stir well. The mixture should be fairly thick. I do like it a little on the runnier side though. Pour the mixture into a bowl, cool to room temperature, cover and refrigerate for at least 2 hours.

TO ASSEMBLE

INGREDIENTS:
Oil, enough for deep-frying
Raspberries

METHOD:
Pour the oil into a deep pot and heat to about 350ºF. Meanwhile, divide the chilled tapioca soups evenly among 3 shallow dishes (or you could be like me and use martini glasses instead). Break the raspberries into chunks and sprinkle around. Place 3 layers of paper towel on a plate close to the stove.

When the oil is hot, drop a few croquettes into the pot and fry them until they are golden brown. It should not take longer than 3 minutes. (If the croquettes were frozen for more than 6 hours, my experience indicates that removing them from the freezer about 30 minutes before you are ready to fry them creates nice soft centers.) Using a skimmer or slotted spoon, remove them from the oil and place them on the paper towels. Fry the rest of the croquettes that you need.

For each serving, put 2 croquettes over the tapioca soup. (The thicker soup holds the croquettes better.) Scatter a few pieces of ginger confit and some of the syrup. Serve immediately.

These croquettes should be a crowd pleaser! Or maybe I only befriend people who love chocolate! Anyway, you should give them a try. The one great thing about this dessert is that everything can be prepared in advance except the frying.

Jan 27, 2013

Pizza alla Carbonara

You probably have had pasta alla carbonara. It's pretty classic. But how about the inspiration that it brings to the pizza world? Apparently it has become somewhat of a big thing in the past few years. When the pasta sauce is made, an egg is mixed into the sauce once the fire is turned off and then the spaghetti is immediately tossed into it before serving. When it comes to pizza, eggs are cracked on top instead. I kinda think it makes the pizza more whimsical.

I had my first pizza alla carbonara at La Madia here in Chicago. (And if you do visit that place, make sure you order the mushroom bruschetta too!) It was yummy! And it made me want to try to replicate that at home. Unfortunately restaurant dishes don't always come with their recipes attached. But they do list some ingredients so that's fine with me. So here's my interpretation of La Madia's version, and I hope you like it.

photo-008_zps1e2baaf2 photo photo-008_zps1e2baaf2.jpg

I made the first one using regular wheat dough that a friend brought over for dinner. And then since I've recently gotten into making gluten free food, I wanted to try that. After doing a bit of research, I found a recipe for GF pizza crust on food.com that had great reviews. The following is just a slight modification of that recipe. 

For the crust: use your favorite wheat crust recipe or the following one for the GF version.

INGREDIENTS:
1.5 Tsp flaxseed meal and white rice flour that make up 2/3 cups*
1 Tsp active dry yeast
1/2 cup tapioca starch/flour 
2 Tsp dry milk powder
2 tsp xanthan gum
1/2 tsp salt
1 tsp unflavored gelatin
1 tsp dried herbs that go well with pizza
1 large clove of garlic, chopped
2/3 cup hot tap water (110ºF)
1/2 tsp honey
1 tsp olive oil
1 tsp cider vinegar

*The original recipe calls for brown rice/gram/fava bean flour.

METHOD: 
Preheat over to 425ºF.

Using regular beaters in a bowl that can hold all the ingredients, beat on low speed to mix and then on high speed for 3 minutes. The dough should be sticky but not like usual wheat dough, you might need to spoon it onto your pizza pan.

Turn the dough onto a slightly greased pizza pan/flat cookie sheet, generously sprinkle the top with rice flour. Use your hands to press the dough down, make sure it gets as thin as possible with the outside edge being thicker to hold the fillings. It should form a circle of ~6in radius. 

Bake the crust for 10 minutes. Remove from the oven.

TOPPING INGREDIENTS:
6oz mascarpone 
Some freshly shaved pecorino romano
4oz guanciale, 1/2in thick, diced*
1 large leek, white and light green parts sliced

*If you can't find guanciale, substitute with pancetta

METHODS:
In a pan, cook the guanciale to render some fat off, remove the pieces.

Retain ~1tsp of the rendered fat, saute the leeks until they are soft. 

Spread the mascarpone on the GF crust that has been partially baked or your favorite wheat crust, sprinkle generously with the pecorino romano. Spread the cooked leek over the cheese and scatter the guanciale pieces on top.

Slide the pizza onto the hot stone (or keep it in the pizza pan), bake for about 12minutes. Crack 2 organic eggs on top and bake for ~8 more minutes, the egg whites should be cooked but the egg yolks should still be runny. Remove and serve, keeping the pieces with the runny egg yolks for your favorite dinner guests/family members ;)

Nov 5, 2012

Granola

It's been more than 3 months since I last posted something. Well, I went away for a while and when I came back I just didn't feel motivated to post anything. 

I think I first wanted to make my own granola after the spring break camping trip. I started with Alton Brown's recipe but have since modified it. I think I can call it my own now, ha! 

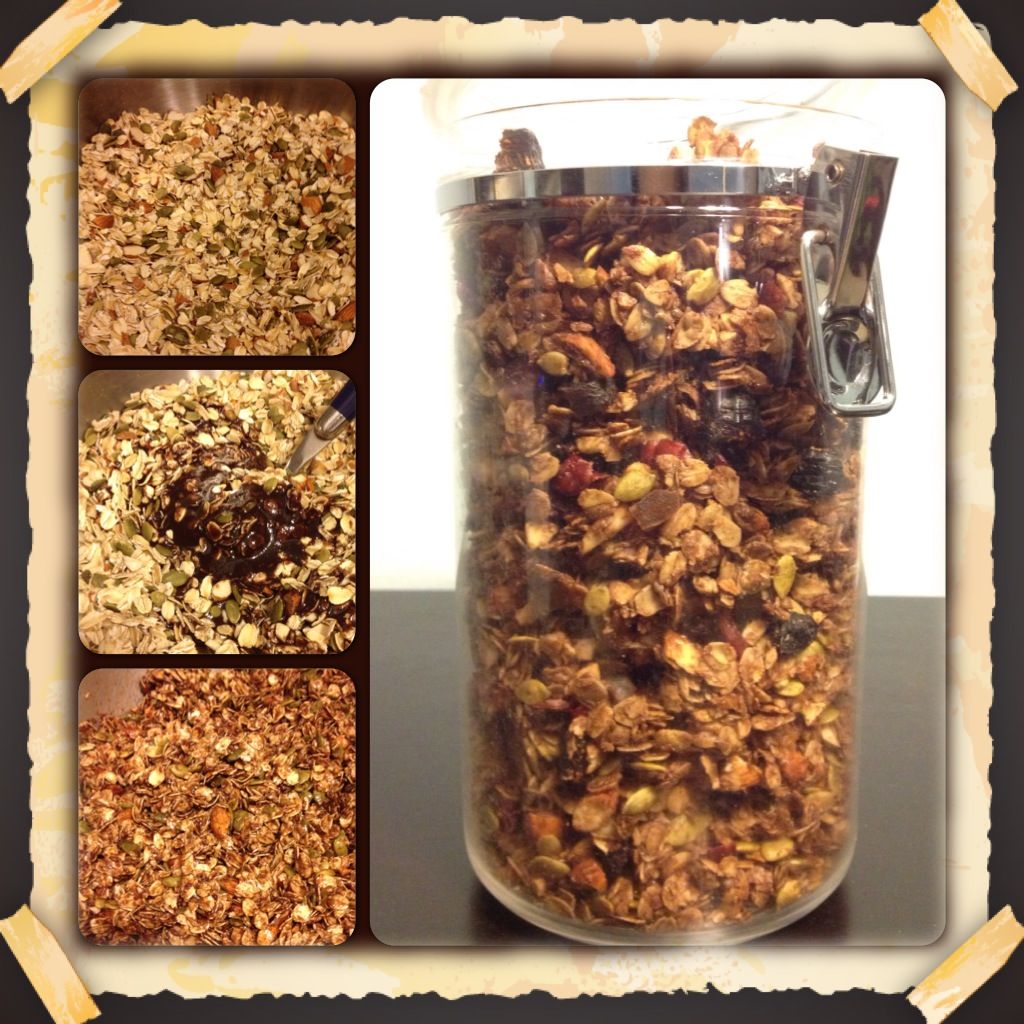
Granola is really very easy to make and yet tastes so much better than the store-bought stuff. I think my granola is very tasty if I am allowed to say so myself. But if you don't believe me, then I could quote a friend who thinks it's "dope". I think what really makes it great is that I use good ingredients. The photos in this collage go like this: dry ingredients, wet ingredients mixed in (I kinda wanted to give you an idea of how dark the mixture is), the mixture ready to hit the oven, and last but not least, the final product. 

Photobucket

So here's how simple it is. You basically have a lot of room to modify this. A lot of people like to add dry coconut flakes. Well, my relationship with coconut is a funny one. I love coconut cream, and  coconut water but you have to give me a lot of money for me to want to eat coconut flakes. Just make sure you have a total of about 5 cups of dry ingredients.

INGREDIENTS:
3 cups old-fashioned oats (use the GF kind if you want to make it GF)
1 cup raw pumpkin seeds
1 cup nuts (I often use almonds and/or walnuts)
1/4 cup brown sugar
~1/4 cup flax seeds (actually I normally add 2 palmfuls)

3/4 tsp salt*
1 tsp ground cinnamon
~1/8 tsp ground nutmeg
1/4c and 1Tsp oil**
1/4c maple syrup
1 Tsp honey
2 Tsp cocoa powder

1 cup of mixed dried fruits. I use cranberries and chopped figs and apricots. 

*I like somewhat of a pronounced taste of salt in my granola but if you don't like it, use less. 
**You might want to change the amount of liquid a bit depending on how much you want your granola to cluster.

METHOD:
Preheat the oven to 250ºF. 

In a large bowl, mix the first group of ingredients together. Make sure the brown sugar is fairly evenly distributed.

In a small bowl, mix the second group of ingredients together until homogeneous. DO NOT, I repeat, DO NOT just consume this mixture straight up no matter how tempting that might be. Or go ahead and do it, just don't tell anyone! Then add this mixture to the dry ingredients, mix well.

Line a half-sheet pan with parchment paper. Spread the mixture evenly. Bake for ~1h. Remove and let cool completely in the pan. I have learned that you can skip the parchment paper altogether and remove the granola from the pan immediately after it's done but you will end up with no clusters at all. It will still taste wonderful though. Mix the dried fruits in and there you have it. I said it was easy, right?