Jun 21, 2012

Orange and Cranberry Pavlovas

Okay, so back to desserts! (You should have figured out by now that I have a sweet tooth, right?) I made this dessert a while back when I had friends over but this post has been sitting on the back burner for, well, about two months now. I am truly an expert at procrastination!!!!!

I've always thought they look really pretty but somehow I didn't get the motivation to try making them until that day. I think it's probably because there isn't any chocolate in it :D. A few days before making them, I learned that pavlovas originate from New Zealand and that they are named after the Russian ballerina Anna Pavlova as they look like tutus. I thought that it's quite an interesting tale!

They are easy to make and you can make the toppings as rich or as healthy as you want so that's great. Here's one that's on the richer side as there's whipping cream involved. For a healthier version, use your favorite yogurt instead. 

INGREDIENTS:
Make 6 servings

3 large egg whites, at room temp.
1/2 tsp cream of tartar
Pinch of salt
1/2 cup granulated sugar

1 cup granulated sugar
1/2 cup water
1/2 vanilla bean
1 large navel orange or 2 medium blood oranges
2 cups cranberries
1 cup heavy cream
1 Tsp confectioners' sugar

METHOD:
Preheat the oven to 250ºF. Line a large baking sheet with parchment paper. Arrange a rack in the middle of the oven.

Beat the egg whiles with the cream of tartar and salt at medium speed until soft peaks form. Increase the speed to medium-high and gradually beat in the sugar, 2 tablespoons at a time, until the meringue is stiff and glossy, about 6 minutes.

Using a large spoon, dollop 6 mounds of meringue onto the baking sheet. Spread the mounds into rounds with an indentation in the center of each one. Bake the meringues for 1 hour 45 minutes, until the outsides are firm but the insides are still slightly soft. Shift the pan from front to back half way through. Transfer the sheet to a rack and let the meringues cool completely.

Meanwhile, in a small saucepan, combine the granulated sugar and water. Scrape the vanilla seeds onto a plate and place the pod in the pan. Add a long strip of zest from one of the oranges. Half an orange and squeeze the juice into the saucepan. Bring to a simmer, stirring until the sugar dissolves. Add the cranberries and cook until they are softened, about 8 minutes. Let cool completely. Discard the vanilla pod and orange zest. Refrigerate the cranberries until chilled.

Grate the zest of the remaining orange into a food processor. Peel the orange, remove all the white pith, cut in between the membranes to release the orange sections into the food processor. Pulse until chopped.

In a clean bowl, using clean beaters, whip the cream with the confectioners' sugar and vanilla seeds until firm. Add the chopped orange and its juice and beat just until combined.

Arrange the meringues on plates and spoon a mound of orange whipped cream into each one. Using a slotted spoon, top with the cranberries. Drizzle with some of the juices and serve right away.

Photobucket

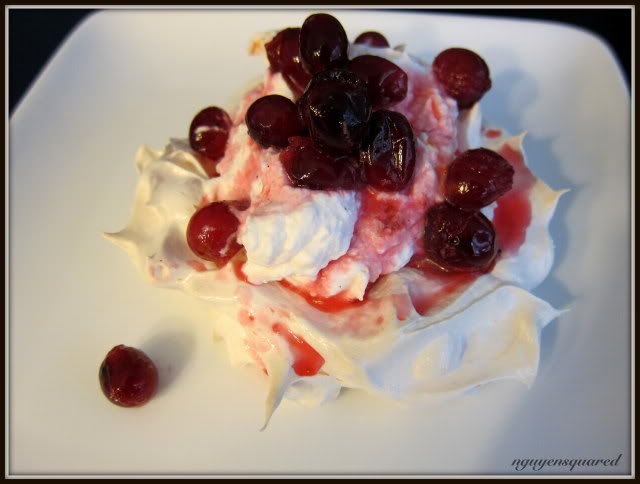
It looks pretty, doesn't it? And this recipe is a good way of using up leftover egg whites.

Jun 14, 2012

Chocolate-Coated Candied Orange Peels

This recipe results in cute little "candies" that make you look like a pastry chef. And since I've posted the recipes for the components that go into these little snacks, this post is probably gonna be the shortest ever!

INGREDIENTS:
Candied orange peels
Tempered chocolate, preferably a bittersweet that is fruity and not too dark, like Valrhona Manjari

METHOD:
Drain the peel and pat each piece dry between paper towels. Lay the peels out on a cooling racks in a single layer and allow the peels to dry overnight at room temperature.

Line a baking sheet with parchment paper and set it close to the tempered chocolate. Dip the peels into the chocolate, allow the excess chocolate to drip back into the chocolate bowl.

Photobucket

(Please excuse the not-so-sharp picture, I took it with one hand holding the tongs and the other holding the camera.)

Place the coated peels on the parchment-lined pan. Chill in the refrigerator for 15 minutes to set and dry the chocolate. Carefully remove the coated peels and serve, or packed in clear sachets as gifts.

Photobucket

The peels themselves are soft, sweet, and tangy while the chocolate provides its typical crunch. And of course, the orange and chocolate combination is pretty classic, right? Enjoy!

Tempered Chocolate

I think of this post as something essential but kinda boring, in the sense that I'm not going to post any photos. So why do we need to temper chocolate? Well, the answer lies in the aesthetics. You have probably noticed how a good bar of chocolate looks shiny, and is firm but easy to break while baking chocolate looks kinda dull and unappealing, right? That's because the chocolate bars meant for direct consumption are in temper. 

Most home cooks rarely need to temper chocolate because the process is unnecessary when chocolate is mixed into some sort of dough or batter. But it is absolutely essential if you want to create chocolate-coated fruits or candies that process the beautiful shine making them look like they have been obtained from a professional shop.

Tempering chocolate sounds scary, doesn't it? It took me a while before I made my first attempt. I have since done it a few times and find that the advice you get when you do a quick "tempering chocolate" google search: 1) it's much much easier to temper chocolate in large quantity, and 2) it requires PATIENCE!!!!!! And if I can do it, so can you because I have never been known for my patience!

So, tempering really means melting, cooling, and reheating. These processes disrupt the structure of the cocoa butter in the chocolate and then re-stabilize it. However, the range of temperature to reheat the chocolate is small so an instant thermometer is needed for this process. 

So start out with at least 1 pound of premium-quality chocolate, finely chopped. Take some time to do this if you must, you don't want to have to melt big chunks of chocolate later on. I have tried half a pound but that really required extreme care as the chocolate reheats very quickly. 

Melt the chocolate in a bowl over simmering (but not boiling) water. If you want to "seed" the chocolate later on, keep about 1/4 of the chocolate. You could also melt the chocolate in a microwave by heating it up in spurts and then stirring but it's less easy to control. Make sure the chocolate melts completely by allowing it to reach at least 115ºF (or 45ºC).

Remove the chocolate from the heat, allow it to cool to a temperature between 80ºF and 83ºF (or 27-28ºC). This can be achieved by either leaving the chocolate to cool at room temperature, with occasional stirring, or by adding some chunks of the same type of chocolate (but not more than 30% of the weight of the melted chocolate) to the melted chocolate (this is referred to as seeding).

Before you reheat the chocolate, make sure you have a heating pad wrapped in a towel or a heat lamp ready if you are going to work on the tempered chocolate for a while. 

Reheat the chocolate to restabilize the cocoa butter crystals. The range of temperatures for different types of chocolate are:
- dark chocolate: 87-89ºF, 30-32ºC
- milk and white chocolate: 85-88ºF, 29-31ºC.
If you accidentally heat the chocolate to above the range for its type, no worries, all you need to do is to heat it back up past 115ºF and repeat the process of cooling and reheating. 

The chocolate is now in temper and ready to use. You can do a quick test by dipping a knife in the chocolate and put it in the refrigerator for a few seconds. It should come out with a shiny, streak-free layer of chocolate. While working with the tempered chocolate, if you use a heat lamp, make sure it's at a fair distance away so that the chocolate is not over-heated. 

Have fun tempering chocolate! I can't guarantee that your temper will remained tempered during this process though :D

Jun 12, 2012

Candied Orange Peels

I'm in the Big Apple on a rainy day so instead of happily strolling around I'm sitting here writing this post. I am not quite sure which category to put this one in: snacks? candies? Hmm!!! But I suppose that's minor detail.

I think partly because most people don't usually candy anything. As a result, they are afraid of it and are easily impressed by people who do. In the past, when families spent time rather than money to prepare for lunar new year in Vietnam, they candied a lot of different fruits/roots, the most common being thin ginger slices, thicker slices of coconut "meat", etc. We do this by cooking the fruits in sugar (the fruits normally release enough liquid) until the sugar has completely dissolved. We then continue to cook over low heat until the moisture evaporates and the sugar recrystallizes, forming a coat on the slices. For citrus fruits such as kumquats or tangerine rinds, we only cook till most of the liquid is gone but the fruits are still moist and sticky. The Vietnamese grandmothers are definitely not afraid of candying fruits :))

However, the recipe I'm going to post is not what Vietnamese usually do when candying fruits. Is is a slight adaptation of Pierre H's recipe. It can be used to candy 4 grapefruits, 5 oranges, or 6 lemons. I have not tried candying lemon peels simply because I didn't have a need for that much left-over lemon juice. Maybe if I decide to make lemonade one of these days then I will try candying lemon peels. I find that the grapefruit rinds are thicker but softer than the orange ones when candied. I personally prefer the texture of candied orange peels but you can choose whatever one you like. The candying process takes a bit of time but the active time is not long so you should definitely not be afraid of doing this. 

INGREDIENTS:
5 oranges
450g sugar
1L or 1kg (or 1000g) water
1 plump, moist vanilla bean
1 star anise
~15 black peppercorns, bruised

Apart from the sugar and water (which can almost always be found in any kitchen), the rest of the ingredients can be summarized in this photo.

Photobucket

METHOD:
Bring a pot of water to a boil. Meanwhile, make two thin slices on the ends of each orange, then cut the peels into strips of about 1-in in width, make sure that you include a sliver of the orange pulp in each strip. When the water boils, place the orange peels into the pot, let boil for 2 minutes. Get a colander ready. Remove the orange peels to the colander and run cold water through them for 2 minutes. This process is called blanching. Do not discard the boiling water as you need to repeat the blanching process two more times. The effect is to remove the strong bitter taste from the peels.

Split the vanilla bean lengthwise and scrape off the pulp. Place both the pulps and the pod together with the rest of the ingredients in a lidded cooking vessel large enough to accommodate everything and cook over medium high heat to bring the water to a boil. Stir briefly to make sure the sugar dissolves. Once the mixture comes to a boil, add the blanched peels and reduce the flame so that the water simmers gently. Cover and let the peels cook for about 1.5 hours. Stir occasionally.

Turn off the heat and let the peels macerate in the cooking liquid overnight. Then, the peels can be kept in a jar together with the cooking liquid in the refrigerator for up to 3 weeks. They can be chopped up and used in other recipes or dried on a rack overnight before being rolled in sugar or dipped in chocolate.  The cooking liquid can be strained and reduced to the desired consistency before being served over pancakes.

Jun 5, 2012

Broken Rice

Today I'm giving you guys a break from desserts and posting about this savory Viet dish instead. I've made this dish multiple times but I kept postponing posting about it because it has so many different components. In addition, like most Viet dishes that I make, I don't measure exact amounts of ingredients that go into it. Instead, I kinda just season, taste, season again. So what's written here is only a rough guide. 

Here's a little about this dish. Pork is the most commonly used meat in Vietnam and this dish is a celebration of pork. I have always wondered how this dish was created, and why there is so much pork in it. But I still don't have the answers to those questions. I also suspect that in the past, broken rice is the the inferior grains that come off the mills due to their sizes and people back then used these since they couldn't afford the higher quality one. Yet, to the accustomed Viet palate, if you make all the toppings for this dish and then serve them with regular long grain rice, it just doesn't taste right. I swear it's not just a psychological thing! There must be something about how this combination works. In case you are wondering how this type of rice looks, here's a picture.

Photobucket

It can be found at any Viet grocery stores. Okay, let's tackle the components one at a time.

For the pork chops.
INGREDIENTS:
4 fairly thin cut pork chops (about 1/3 inch in thickness), tenderized
1 medium shallot, finely chopped
3 garlic cloves, finely chopped
2 tsp honey
1 Tsp fish sauce
2 Tsp cooking wine

METHOD:
Mix everything except the pork chops together. I normally do a little taste test at this point. Let the pork marinate in this mixture for at least 2 hours but overnight is best, turning a few times. It's easiest to marinade the chops in a large zipbloc bag as "turning the meat" really means flipping the bag over if you arrange the chops in single layer.

Cook the meat over a grill (or an indoor griddle if you are like me).

For the pork skin
INGREDIENTS:
1/2 package cooked frozen pork skin
1 Tsp uncooked rice
3-4oz lean pork

METHOD:
Soak the pork skin in warm (but not hot) water, drained well.

Cook the pork simmering water flavored with some sugar and fish sauce (or salt if you don't want your kitchen to smell like fish sauce afterward). Slice the pork into strips the size of the pork skins.

Toast the rice until it's brown then ground to fine powder. This is roughly what you should get.

Photobucket

Alternatively, you could buy ground toasted rice powder at Viet grocery store.

Mix the pork skin, pork strips, and toasted rice powder together, season with salt and freshly ground black pepper. Once made, this can be kept in an airtight container in the refrigerator for up to one week.

For the pork custard
INGREDIENTS:
1 large egg, white and yolk separated
6oz pork shoulder, trimmed most but not all the fat, ground*
~1 Tsp wood ear mushrooms, rehydrated, sliced into strips**
A bunch (I know it's highly accurate but I really just eyeball the amount) vermicelli, soaked in warm water, cut into 1.5in sticks.
1 garlic clove, finely chopped
1 pearl onion (or some other kind of onions), finely chopped

*You could just buy ground pork from the grocery store but I find it to contain a lot more fat than I'd like so I normally grind my own.
**Asian grocery stores sell dried wood ear mushrooms that have been pre-sliced so they only need to be rehydrated in hot water.

Mix everything except the egg yolk together. Season with freshly ground black pepper and fish sauce. To see if the mixture has been well-seasoned, quickly pan-fry some and taste. It's okay to slightly under season it as the whole dish is served with dipping sauce. Divide them into ramekins (or some other vessels) and steam for about 18-20min. I don't have a steamer so I cooked them the way I would flan or other types of custard, i.e. placed in a larger baking dish that is filled with hot water up to about half the height of the ramekins, covered with foil and baked in the oven at 350ºF.) Stir the egg yolk with a fork and then divide it evenly among the ramekins, steam/bake for another 2 minutes till the yolk is set. To create a nicer color, bleed about 1/2 tsp annatto seeds in 1tsp hot oil. Remove the seeds, cool the oil and then mix it into the egg yolk before brushing the top of the pork custard. Voila.

Photobucket

For the rest of the dish
INGREDIENTS:
Pickled carrots and daikon radish, recipe here
Lettuce (red leaf or boston)
Cucumer, sliced
Uncooked dipping sauce, recipe here
2 cups broken rice, cooked

METHOD:
Arrange the different components on a plate, served with the dipping sauce.

Photobucket

Phew!!! That was a long post, no wonder I kept postponing writing this one. And, as always, bon appetit!

Jun 3, 2012

Warm Chocolate Raspberry Tart

As warned from the previous post, this one is another about tart. This tart is for serious chocoholics (and preferably those who happen to also love raspberries). This is another recipe by Pierre H. It's so so simple, yet so very decadent and pleasing. It's wonderful served either warm or chilled but I very much prefer the texture when it's warm. I think the hardest part of this tart is making the dough. The rest can be prepared and served within 15min. How much easier can it be, right?

For the crust, you would use your favorite recipe, or you could follow Pierre H.'s recipe for almond tart dough here. Let it cool to room temperature.

As for the fillings, here we go.

INGREDIENTS:

1 pint red raspberries
5 oz (145g) bittersweet chocolate
1 stick unsalted butter, cut into 8 pieces
1 large egg, at room temp., stirred with a fork
3 large egg yolks, at room temp., stirred with a fork
2 Tsp sugar

METHOD:

Center a rack in the oven and preheat the oven to 375ºF (190ºC).

Scatter half of the raspberries on the crust.

Melt the chocolate and the butter in separate bowls (I normally melt butter in the microwave), make sure the bowl for the chocolate is large enough to hold all the ingredients. Allow them to cool until they fell warm to the touch, about 104ºF (60ºC). 

Using a small whisk or a rubber spatula, stir the egg into the chocolate, stirring gently as you don't want to incorporate air into the ganache. Little by little, stir in the yolks, then the sugar. Finally, gently stir in the melted butter. Pour the ganache over the raspberries in the tart shell.

Bake the tart for about 11 minutes, or until the top just turns dull like the top of a cake. Remove the tart from the oven and cool it on a rack for about 10 minutes. Cut and serve. Here's what I had.

Photobucket

It might not look as perfect as the previous fruit tart but let me tell you something, if you enjoy chocolate, this one is infinitely better than the other one!!! So go ahead, have friends/family over and be prepared to blow their minds!

IF you have leftover tart, you could keep it in the refrigerator. It's still amazing when chilled and served the next day, the texture is a lot denser though.

Jun 2, 2012

Fruit Tart

The next two entries are gonna be about tarts since I made a large batch of tart dough. But before you accuse me of only sticking to chocolate desserts, I kinda plead guilty to that. But now and then I reluctantly stay away from chocolate desserts. But given a choice, I would still go for something chocolaty. Anyway, last weekend I decided to make a fruit tart because 1) it felt like summer, 2) it was for a kid's birthday party where most people aren't quite like me, i.e. a chocoholic, and 3) I still had a dish of sweet tart dough in the freezer (which I originally made for a, you guess it, chocolate tart.)

Before we begin, I have to warn you that this tart dough is really good but requires advanced planning as it needs time to chill. If you decide to make a tart impulsively, I suggest trying Ina Garten's easy dough, it can be used right away. 

So let's start with the sweet tart dough. This recipe is by Pierre H. He recommends making it in a large batch to avoid overworking the dough.

INGREDIENTS:
2 1/2 sticks (285g) butter, at room temp.
1 1/2 cups (150g) confectioners' sugar, sifted
1/2 cup lightly packed (100g) finely ground almond powder
1/2 tsp salt
1/2 tsp vanilla bean pulp or vanilla extract
2 large eggs, at room temp., lightly beaten
3 1/2 cups (490g) all-purpose flour

METHOD:

To make the dough in a mixer:
Place the butter in the bowl of a mixer fitted with the paddle attachment, and beat on low speed until creamy. Add the sugar, almond powder, salt, vanilla, and eggs, and beat to blend the ingredients. Add the flour in three or four additions and mix only until the mixture comes together to form a soft, moist dough - in seconds. Don't overdo it.

To make the dough in a food processor:
Place the butter in the bowl of a food processor fitted with the metal blade and pulse, until creamy. Add the sugar and process to blend well. Add the almond powder, salt, and vanilla and continue to process until smooth, then add the eggs and blend. Add the flour and pulse until the mixture just starts to come together. When the dough forms moist curds and clumps and then starts to gather into a ball, stop!

Once you are done with making the dough by either method, gather it into a ball and divide it into 3 or 4 pieces: 3 for 10-in tarts, 4 for 9-in ones. If you have not made tart shells before, I suggest dividing into 3 even if you use the smaller tart pan. Gently press each piece into a disk and wrap each disk in plastic. Allow the dough to rest in the refrigerator for at least 4 hours, before rolling and baking. (When wrapped airtight, the dough can be kept in the freezer for up to a month.)

For each tart, place a (buttered if not nonstick) tart ring on a parchment-lined baking sheet. Work with one piece of dough at a time, keep the remaining in the refrigerator.

Lightly flour a work surface, roll a dough to a thickness of between 1/16 to 1/8in (2 to 4mm), lifting the dough often and making certain that the surface and the dough are floured at all times. Roll the dough up around your rolling pin and unroll it onto the tart ring. Fit the dough into the bottom and up the sides of the ring, then run the rolling pin across the top of the ring to cut off the excess. If the dough cracks or splits as you work, patch them with scraps but make sure not to stretch the dough that's in the pan. Use a fork to prick the dough all over (unless it's going to be filled with a runny custard or some other loose filling), and chill it for at least 30min in the refrigerator. 

Preheat the oven to 350ºF (or 180ºC). Fit a circle of parchment paper or foil into the crust and fill with dried beans or rice. 

Bake the crust for 18-20min, until it is very lightly colored. Remove the parchment paper and beans and bake the crust for another 3-5min, until golden. Transfer the crust to a rack to cool.


For the custard, I used another recipe by P. It's creme de patisserie, or pastry cream. It's quite versatile and can be used to fill eclairs, cream puffs, etc.

INGREDIENTS:
2 cups (500g) whole milk
1 moist, plump vanilla bean, split lengthwise and scraped 
6 large egg yolks
1/2 cup (100g) sugar
1/3 cup (45g) cornstarch, sifted
3 1/2 Tsp unsalted butter, at room temp.

METHOD:
In a small saucepan, bring the milk and vanilla bean (pulp and pod) to a boil over medium heat. Cover the pan, turn off the heat, and allow the mixture to rest for 10min. 

Fill the bottom of a large bowl with ice cubes and water. Set aside a smaller bowl that can hold the finish cream and be placed in this ice bath. 

Whisk the yolks, sugar, and cornstarch together in a medium saucepan. Whisking all the while, very slowly drizzle a quarter of the hot milk into the yolks. Be patient or your yolks will be scrambled. Still whisking, pour the rest of the liquid in a steady stream into the tempered yolks. Remove and discard the vanilla bean pod (or use it to make vanilla sugar). Place the pan over medium heat and whisk vigorously and without stop until the mixture comes to a boil. Whisk energetically for 1-2min. By now, the mixture should have thickened. Remove the pan from the heat and scrape the pastry cream into the prepared bowl.

Set the bowl into the ice-water bath, and stir frequently to keep the mixture smooth. Cool the cream to 140ºF (60ºC). Remove the cream from the ice-water bath and stir in the butter in three or four additions. Return the cream to the ice-water bath and keep it there until it is completely cool, remember to stir it occasionally.

To assemble the tart:

INGREDIENTS:
1/2 cup apricot jam
1 Tsp water
Fruits

METHOD:

For the fruits: you may choose to use any combination of fruits you like, for the best look, mix fruits with contrasting colors. Here, I used blueberries, raspberries, strawberries, and mango.

Heat the jam-water mixture to create a glaze.

Brush the tart crust with a layer of glaze to prevent it from getting soggy from holding the pastry cream. Let the glaze gel for about 20min. You will get something that looks like this

Photobucket

Remove the crust from the tart ring. Spread the cream evenly to cover the entire height of the tart.

Arrange the fruits according to your preference. Brush the tops of the fruits with a layer of glaze to prevent them from getting dry and to give your tart that nice shine. And voila!

Photobucket

Bon Appetit!