Jul 22, 2011

Ricotta Pancakes and Orange Syrup

Pancakes, what can I say? An American staple? For breakfast at least. My first pancake experience was in Common, one of the dining halls at my college. I wasn't a fan, perhaps because the pancakes weren't good (I don't blame them, it's hard to serve quality ones to hundreds of students) and the syrup was just too sweet for my taste. Then a few years ago I first made my own. That was a completely different experience. And so now and then when I wake up on weekends, sometimes I feel like making pancakes.

This pancake is really moist and fluffy thanks to the whipped egg white and ricotta cheese. The corn meal also adds a nice textural difference to the cakes. The down side is that you kinda do have to put some ingredients on your shopping list as it's not your usual pancake recipe. Well, I made this last weekend for brunch before watching the Women World Cup final between the USA and Japan. Anyway, the US team lost, albeit being the stronger one, which made me too sad to bother posting this earlier. I'm still sad :((, but the pain has subsided.

INGREDIENTS:
Make about 8-9 pancakes, for 2-3 servings
For the syrup:
1 large orange
Granulated sugar

For the topping:
3/4 cup ricotta
2 tsp sugar
1/2 tsp freshly grated lemon zest
1/4 tsp vanilla extract (or seeds from half a vanilla bean)

For the pancakes:
3/4 cup all-purpose flour
2 Tsp fine white cornmeal
1 Tsp sugar
1/4 tsp baking powder
1/4 tsp baking soda
1 cup buttermilk
1 large egg, separated
1/4 cup fresh ricotta
Vegetable oil/spray, for frying

METHOD:
Using a vegetable peeler, peel the orange rind and cut into strips. Blanch the strips in boiling water for 30s.

In a small sauce pan, cook the juice from the orange, orange strips and sugar over medium heat until a syrup if formed, about 10min. How much sugar to use? Well, that's up to your taste. If you want more syrup, you might consider adding more water/orange juice. Cool completely.

Mix all the ingredients for the topping together.

In a large bowl, whisk all the dry ingredients together. In another bowl, whisk the buttermilk, egg yolk and ricotta together until homogeneous. Fold the wet ingredient into the dry one. 

In a medium bowl, using clean beaters, beat the egg white until stiff peaks form. Fold the whipped egg white into the batter.

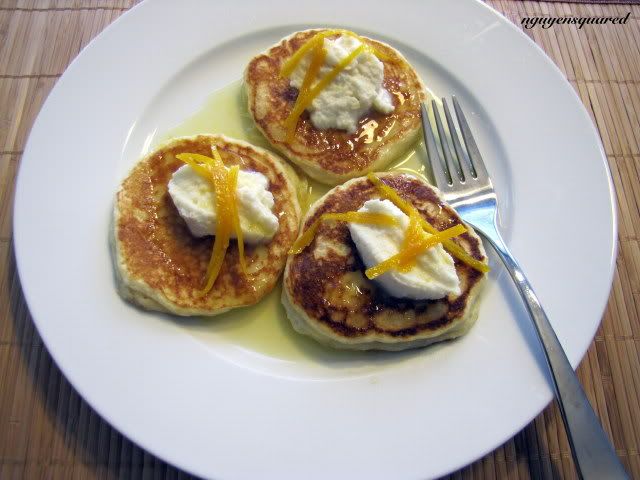
Heat some oil/spray on a cast iron skillet over moderately high heat. Drop in 1/4-cup batter, cook for about 2 min each side. Serve with the ricotta topping and orange syrup. Add powdered sugar on top if you prefer. Here's my brunch:
Photobucket

That first pancake needed some heat control ;) Nonetheless, I certainly enjoyed mine, hope you do yours!
Jul 11, 2011

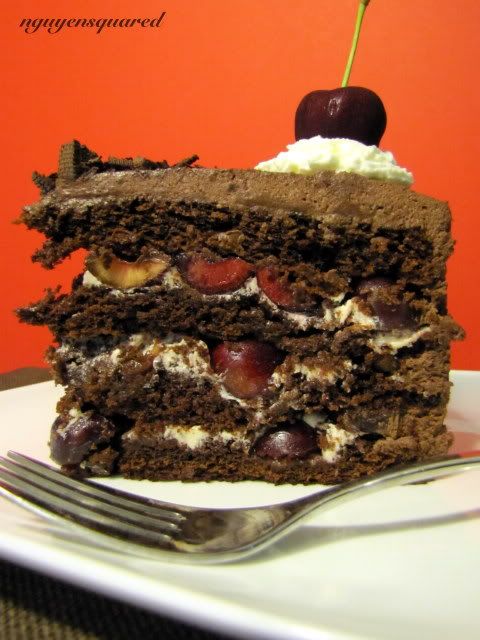
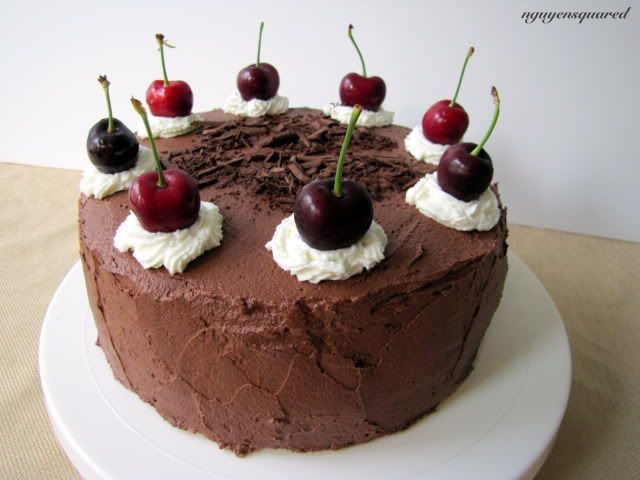
Schwarzwälderkirschtorte a.k.a Black Forest Cake ...

... with a twist, that is. Well, one of my very good friends kept telling me to make this one and I promised her I would when cherries are in season in the US, which they are right now. I said with a twist because I got the inspiration from Lindt chilli cherry chocolate bar, i.e. I added some savory spice to my cake ;)

Anyway, cherries are not only in season; they are on sale which means it's the perfect time to make this dessert. Well, that is because I do not fancy the idea of using canned cherries (I'm such a snob sometimes). But of course you are welcome to use them if you don't have access to fresh ones. You probably will find some recipes that call for whipped cream frosting, that's all well and good. I, on the other hand, likes my frosting with chocolate so I made a chocolate whipped cream frosting, yum! Anyway, that's enough of my rambling. Here's your shopping list:

INGREDIENTS:

For the cake:
1 2/3 cups all purpose flour
2/3 cup unsweetened cocoa powder
1 1/2 tsp baking soda
1 tsp salt
1/4 tsp ground cayenne pepper (optional for the faint-hearted ;))
1/2 cup shortening
1 1/3 cups sugar
1 tsp vanilla extract
2 eggs
1 1/2 cups buttermilk

For the filling:
1/3 - 1/2 cup Kirschwasser 
1/2 cup (1 stick) butter
Pinch of salt
2 tsp strong brewed coffee
3/4-1 cup confectioners' sugar (if you want thicker filling, use more sugar to get more volume of course)
1 1/2 lbs pitted fresh cherries 

For the frosting:
5 Tsp unsweetened cocoa powder
5 Tsp confectioners' sugar
1 tsp vanilla extract
2 cups heavy whipping cream (leave some for the plain top if you prefer)
2 tsp Kirschwasser
1 oz semisweet square

Well, there's certainly room for improvement when it comes to my frosting and chocolate shaving skills but trust me when I tell you that it does taste very good.
Photobucket

METHOD:

Line two 8-in round cake pans with parchment paper. Preheat the oven to 375ºF (or 175ºC)

In a medium bowl, sift together the first 5 ingredients, set aside.

In a large bowl, beat the shortening and sugar until light and fluffy, beat in the vanilla and the eggs one at a time. Alternately beat in the flour mixture and buttermilk.

Divide the batter into the pans. Bake for 35-40 minutes or until your favorite cake test says it's done. (The chocolate cake is good on its own if you don't feel like going the extra steps. Just serve it with vanilla ice cream or homemade whipped cream.) Let cool completely, invert, remove the papers, cut each cake horizontally into two.

Meanwhile, in a large bowl, mix the cocoa powder and sugar into the cream. Chill the bowl and the beaters/whisk in teh refrigerator for about 30 minutes.

Sprinkle the Kirschwasser on the four layers. Spread 1/2 of the cream on the first layer, followed by 1/3 of the cherries. Repeat.

Beat the heavy cream until it thickens, add vanilla extract and Kirschwasser, beat until firm. (I like my frosting chocolatey but if you want yours to be more sweet, add more confectioners' sugar.) Frost the top and sides of the cake. Decorate the outer top with frosting and fresh cherries and the middle with chocolate shavings.
Photobucket

Cut and serve. Your family and friends will thank you, or blame you for making them put on weight ;)

Jul 7, 2011

Bánh Nậm

Bánh nậm is one of the various types of bánh from Huế. It's hard to find an English name for it so I will just leave it as that. It often acts as an appetizer and eaten together with other types of bánh Huế. But since I only cook for myself, I eat this dish as a main course.

For people who have had some experience dining at Viet places, whenever someone else mentions Viet food, dishes like phở, bún bò, bánh mì (Viet sandwiches), filtered coffee, etc. come to mind but not something like bánh nậm perhaps because it is time-consuming and is best served warm, which means the restaurants have to always be on their feet if they put this on the menu. 

Every time I go home, I make sure to eat this before I leave. I think for most Vietnamese living in the South, this dish is often one of their favorites. (For people living in the North and have never ventured South or into a restaurant that serves this, it's their loss in my opinion ;)) Anyway, my thought has always been that this is hard to make because you have to get the right consistency for the flour mixture. But craving won over in the end and I decided to give it a try. I guess it's not bad for the first time ;) So here is the recipe for it. Even if you are not inclined to attempt something so time-consuming, I strongly recommend it the next time you make your way to a Viet restaurant that does offer it on the menu. 
Photobucket

INGREDIENTS:
Make about 30 little "flat cakes"

3/4 cup rice flour
1/4 cup tapioca starch
2 cups room-temp water
1 shallot, finely chopped
2 stalks of spring onions, finely sliced
6 oz (200g) large deveined shrimps with heads and shell on
2 oz (50g) cooked lean pork
1 package of banana leaves (can be found in the frozen section of Viet grocery stores)
Cooking oil
Salt and pepper
Cooked Dipping/Sauce For dishes like these, make the sauce with less fish sauce and do not add lime juice.

METHOD:

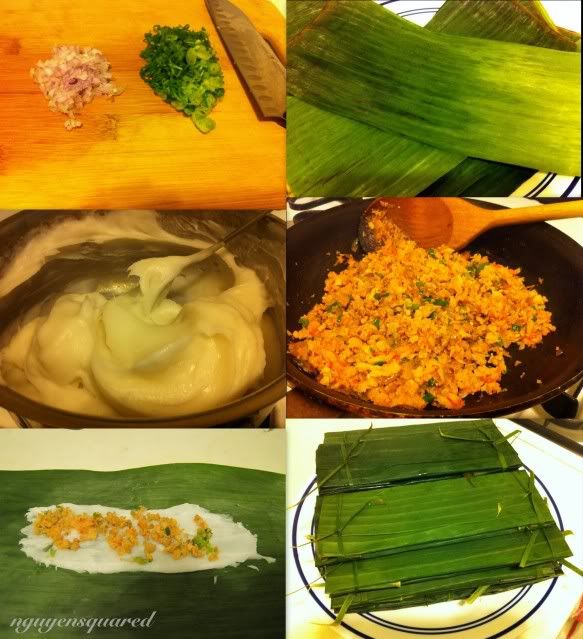
The photo above is kind of a guide of what you should get at each stage.

Wash the banana leaves carefully to remove dirt. Cut the leaves into pieces about 4-inch long, avoid the broken parts. Tear the ends into small strips to tie the "cakes" together.

Boil the shrimps quickly. Remove, let cool. (I used the water I boil the shrimps in to make my sauce, after straining it of course. It gives the dish extra shrimp flavor and umami.) Remove the shells, heads and tails. Reserve the heads. Pound the shrimps until flaky. (You may choose to use your food processor but there will be a somewhat compromise on the texture.)

In a small bowl, squeeze out the "juice" from the shrimp heads. This gives more color to the final product. (This is completely optional.)

Dice the cooked pork into very small cubes and then give it a few chops. (The reason why I cook the pork before chopping it is because I can't seem to chop uncooked pork as finely as I prefer, perhaps because the muscles are tougher when the meat is raw.)

Heat some oil in a skillet. Add shrimp flakes, turn heat down to low. Use the back of a large spoon to smash the shrimps further until they are dry and look like floss. Remove from heat.

Heat some oil in a skillet. Add the chopped shallot and cook until translucent. Add the pork, season with salt and pepper. Add the shrimp floss and cook for about 2 minutes, stirring frequently. Add the juice from the shrimp heads, cook for another 30 seconds. Add the sliced spring onions. Turn off the heat. Stir to mix.

In a sauce pan, dissolve the flours completely in water. Add 1/2 tsp of salt and 1 tsp cooking oil to stop the cake from sticking to the leaves. Cook the mixture over low heat, stirring constantly. When the mixture starts to thicken, cook for another 2 minutes. At this point, there should be some clumps but some watery part is still there. Remove from heat. Keep stirring constantly until you get a smooth mixture, as pictured above.

Spread about 1 Tsp of the flour in the middle of the leave, about 4-in long and 1.5in wide. (Make sure the flour is not too thick.) Spread the filling on top. Fold the sides over and then fold the ends downwards. Lightly press over the top to even out the flour. Tie the ends of two "cakes" together using the banana strips. Repeat until you run out of flour or filling or banana leaves.

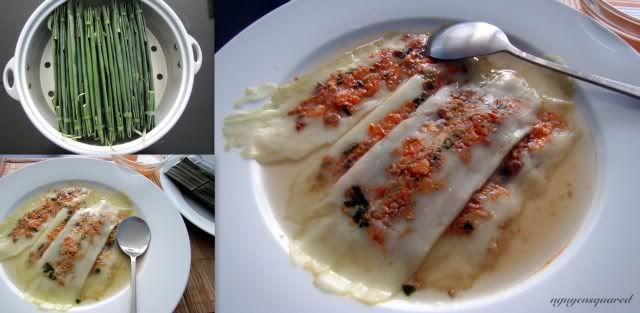
Arrange the cakes standing up in a steamer and steam for about 15-20 minutes.
Photobucket

Let them cool down for a few minutes. Peel off the leaves (they are easier to handle once they have cooled down to being warm and not piping hot) and serve with generous amount of sauce over them. Each spoon that's going to reach your mouth should have a bite of the cake, sauce and perhaps a little piece of Thai chilli. Yum!

Jul 6, 2011

Grilled Meat Noodle

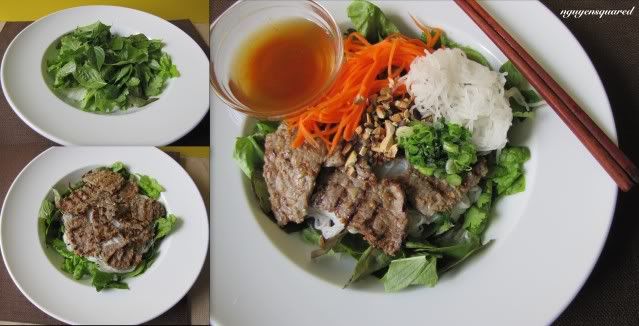
This is my version of quite a popular dish in (the south of) Vietnam called Bún thịt nướng. It's perfect for a summer day although I tend to make it whenever I feel like regardless of what the weather is like. But that's because I grill my meat using an over-the-stove griddle. If you are into grilling outside during the summer, all the more you should try this.

In Vietnam, or in my hometown at least, it's traditionally made with pork, perhaps because it's the cheapest kind of meat there. However, here in the US, if you order it at any Viet restaurant, you have the option of having any of meats you prefer. Also, back in my hometown, the only extra you can add is fried spring rolls but here you may choose to add grilled shrimps, fried rolls or nem nướng. I almost always make it using beef because I think it's tastier than chicken and marinade better than pork, and I often marinade overnight but if you decide to make it on the day, it works fine with an hour of marinading time. This is how the meat looked right before I did the cooking:
Photobucket

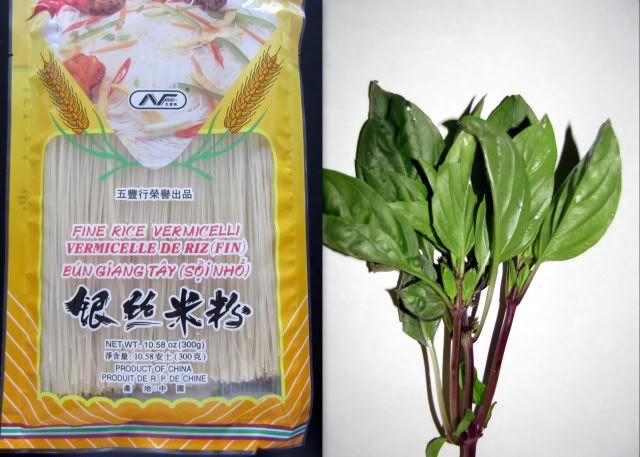
Most non-soup noodle dishes in Vietnam are served with smaller kind of noodles because they soak up the fish sauce well. In my hometown we buy freshly made bún (which translates to round rice noodles) whenever we eat them and the choice is really easy: small or large. Here though, round rice noodles can mean so many things, for example, the Chinese mai-fun is thinner than what we have at home. So here I include a photo of the type of noodles I use (easily available at Asian grocery stores) and my favorite herb: (Thai) basil:
Photobucket

Having said that, I once made this dish and served it with wheat noodles as I didn't have access to an Asian grocery store at the time, and it was fine. So let's get started.

INGREDIENTS:
Make about 4-5 servings

For the marinade:
1 lb beef, thinly sliced
1 large shallot, finely minced
3 cloves garlic, finely minced
2 Tsp finely minced lemongrass
2 tsp honey
2 tsp fish sauce
2-3 Tsp cooking wine
White sesame seeds
2 tsp sesame oil

1 package of fine rice vermicelli
3 spring onions
Lettuce and herbs (such as basil, cilantro, mint, etc)
Roughly chopped roasted peanuts
Quick pickled, finely julienned carrots and daikon, recipe here
Cooked Dipping/Sauce to serve, recipe here

METHOD:

For the marinade: Add everything except beef and sesame oil and mix well in a bowl. Then add the beef slices and toss well to make sure all the slices get some marinade. Cover and refrigerate. Before cooking, add the sesame oil and toss well.

Bring water to a boil, add the rice noodles, stir well to prevent sticking. Once the noodles are cooked (about 4-5 min for the thin ones), strain and rinse with cold water, shake off the excess water and let stand. Toss now and then to prevent the noodles from lumping together and taking on the shape of your strainer/colander.

Thinly slice the spring onions, both white and green parts. Heat a little oil in a skillet and give the onions a stir. Remove from heat. (You could also put the onions with some oil in a microwavable bowl and microwave for 30s or more depending on how much onions you have and your microwave setting.)

In my hometown, the most common lettuce are Boston and escarole. Since Boston lettuce bruises easily, escarole finds its way into a lot of noodle dishes. For this one, herbs and escarole leaves are thinly sliced and then place at the bottom of a bowl before serving. I do that now and then but when I'm lazy, I just tear Boston or redleaf lettuce and herbs, which is what I did for this post.

Grill the meat right before serving. (Or stir fry if you don't have a grill.)

Place lettuce and herbs in the bottom of a bowl/deep dish, followed by noodles, then topped with grilled meat, pickled carrots and daikon, onion and chopped peanuts. Serve fish sauce in a bowl on the side for people to add, like this:
Photobucket

Pour fish sauce over the noodles, mix and enjoy.

Fish Sauce Dippings

Like any kind of food, how it is prepared depends on each family and individual's taste. In my family, we have two categories: one is for dishes that require the literal dipping, like fried spring rolls or other types of rice paper rolls, and the other is for dishes where you pour the sauce over, like noodles and "dumplings". I will just call them the Uncooked and Cooked Dipping respectively.

Cooked Dipping/Sauce
Of course it's up to you how you want to make it but if you have never made it before, I suggest trying the following:

Heat 1 part sugar, 5 parts water until the sugar dissolves completely, let it simmer for a while. Turn off heat and let it cool completely. Add fish sauce to taste. Squeeze some lime/lemon before serving if necessary. Serve with finely chopped chilli or sambal oelek. Generally the sugar:fish sauce ratio is about 1:1. Some people like theirs really dense so they let the sugar water mixture cook for a longer time. Some people prefer to cook the fish sauce together with the sugar but if you have close neighbors you might want to spare them since the fish sauce aroma is not for everyone. 

Uncooked Dipping
Slice a clove of garlic. Use a pestle and mortar/bowl to grind garlic + 2tsp sugar + 1/2 a small seeded (keep the seeds if you want yours really hot) Thai chilli until a paste is form. Add 1-2 Tsp water and dissolve. Add fish sauce (and lime juice) to taste. 


Jul 3, 2011

Lemon Semifreddo

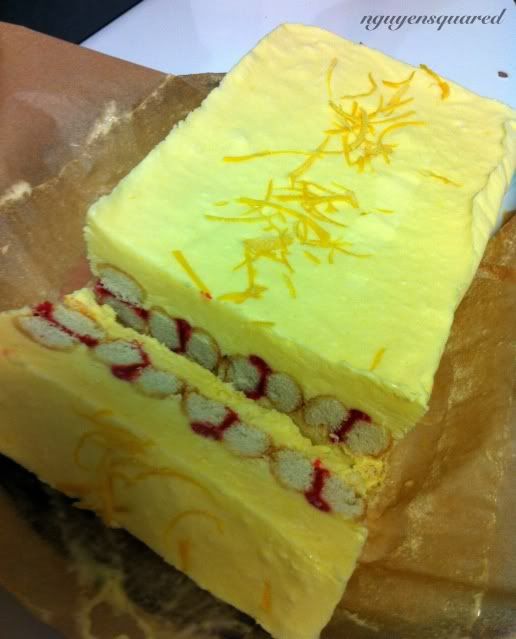
Summer is here, it's time for something cool. Today my friend invited a group of us over for dinner, which was really good, and I volunteered to bring dessert. Well, I think I've said this before but volunteering to bring dessert means I get to try making new things without having to consume the entire end-product by myself so why not, right? Anyway, I tried this recipe from Food & Wine but made some small adjustments. After putting the mix into the freezer, I was hoping it would turn out okay. Well, it was better than I expected ;) When my friend said "for something that doesn't contain chocolate, this is really good," I knew it was a success :D
Photobucket

INGREDIENTS:

1 tsp unflavored gelatin
1 Tsp water
6 egg yolks
3 egg whites
1 cup heavy cream
1/3 cup honey (the original recipe called for 1/2 cup, I used less but it's still quite sweet I think so if you like really sweet things, go with 1/2 cup)
1 tsp finely grated lemon zest
3 Tsp lemon juice
Ladyfingers with jam sandwiched in between (the number of ladyfingers you need depend on which type you use. I bought French ones so I used 16 of them)


METHOD: 

Line a loaf pan with parchment paper, leaving ~3 in on each long side.

In a small bowl, sprinkle the gelatin over the water and let stand.

In large bowls, beat the egg whites till stiff peaks are formed, and the heavy cream till firm. Refrigerate.

In a large bowl over simmering water, whisk the egg yolks and honey until the eggs thicken and an instant thermometer reads 160ºF when inserted. Remove from heat.

Add the gelatin, lemon zest and juice to the egg mixture, whisk for another 5 minutes till the eggs have cooled down. Don't leave it stand there to cool, whisking helps the cooling process and incorporates air into the mixture.

Fold the whipped cream and egg whites into the mixture until no streaks remain.

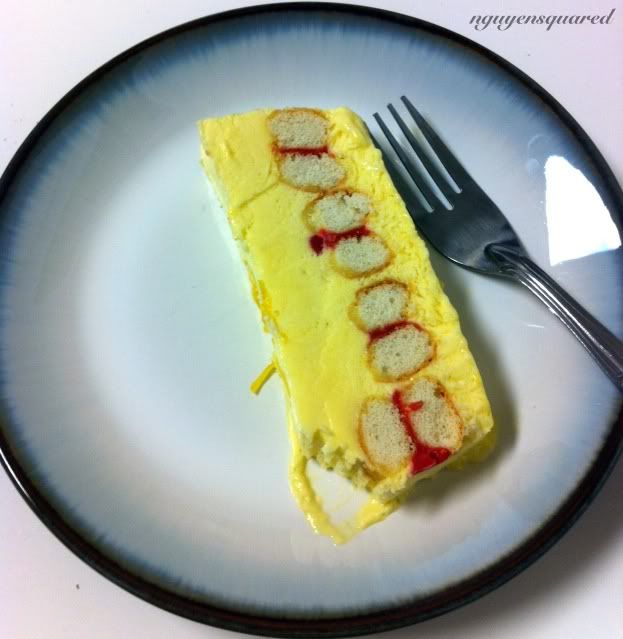
Pour half of the mixture into the pan. Arrange the sandwiched ladyfingers on top and then add the remaining mixture. Add some thinly sliced lemon zest if you like. Lightly cover the top with the overhanging parchment paper. Freeze the mixture for at least 4 hours.

Remove the semifreddo, cut and serve.

I can't resist posting this picture because I really really like my friend's plate. He'd better watch out cuz I might steal one of his one of these days!
Photobucket

Any kind of citrus fruits would work in this recipe as long as the amount of honey is adjusted to compensate the tartness of the fruit. The original recipe in Food & Wine book calls for orange marmalade but I decided raspberry jam would give a better color contrast. Happy making and eating!