Dec 18, 2011

Molten Chocolate Cake

a.k.a Chocolate Lava Cake. This is an extremely quick and easy dessert to make. What's even better is that it's one of those recipes that work for small family, i.e. of size 2. Or if you live by yourself, you can make the batter, bake one, and keep the other for the following day. One last thing, it's sure to please. Well, if a non-vegan is not pleased, you definitely need to check if that person needs Zoloft (or something along that line) instead!

INGREDIENTS:
2 servings

1 egg
1 egg yolk
2 oz chopped good bittersweet chocolate*
2 Tsp sugar
2 Tsp butter, and more softened butter
1 Tsp all-purpose flour
Cocoa powder
Pinch of fine sea salt

*If you can afford, use something like Valrhona. I can't so I settle for Callebaut. 

METHOD:

Preheat the oven to 450ºF.

Mix the flour and salt together.

Grease 2 5- to 6-oz (or 3 4-oz ones)ramekins with softened butter. (Greasing well will ensure your cakes invert easily later.) Coat with the cocoa powder, tap out the excess. You could also use good old all-purpose flour but the cakes will have some white flour spots later. If you are going to sprinkle powdered sugar over your cakes anyway then it really doesn't matter.

In a medium bowl over simmering water, melt the chocolate and butter. Let cool.

In another medium bowl, whisk the egg and egg yolk and sugar until the mixture just turns pale. Add the melted chocolate and butter, mix well. Fold in the flour.

Divide the batter equally between the ramekins. Place the ramekins on a baking sheet and bake for 8-9 minutes, until the outside third is set but the middle two-thirds is still jiggly. You might have to experiment with your oven temperature and baking time as oven temperatures can vary greatly and 30s more could wreck the whole thing. Well, that's an exaggeration, you will still have some chocolate cakes. What you won't get is the oozing goodness. 

Cool the ramekins on a rack for a few minutes. Invert onto plates and serve immediately with vanilla ice cream and some berries, or just powdered sugar, or whatever you fancy. If you do decide to serve with ice cream, let the cake cool down a bit more or it will melt your ice cream very very quickly. But it's hard to wait. I can never be patient enough to wait (hence the messy picture below) knowing what I will get spooning into that small little cake!

Here's what I had:

Photobucket

I served mine over a candied orange wheel and raspberry sauce, topped with ice cream. And please please pardon the terrible sugar decoration, it was a rushed experiment.

The batter can be kept in the refrigerator for up to a day. In that case, let them cool down to room temperature before baking.

Dec 15, 2011

Dry Wonton Mee

I can't remember when I first ate this dish. It's probably during my third year in Singapore (we were so poor my friends and I rarely ever ate out during our first two years there). I think I ate it at my school's canteen. NJC's canteen had a few of my favorite dishes and I always got them whenever I managed to get down quickly enough before a long line formed. The left most store served fried hokkien mee on Tuesdays and Thursdays (I think), and the right most store had briyani (whose name I asked my roommate multiple times before I got it) on Fridays. Of course there's always yong tau foo with its forever long line and the noodles store where I could get wonton mee, or sometimes mee pok. 


The concept of dry wonton noodles had been foreign to me. There are places in my hometown that serve wonton noodles too but they were always the soupy type, perhaps because the weather was always cool enough for a bowl of piping hot noodles. Well, I don't know since when this has been one of my favorite dishes to eat. Now, I make it sometimes, trying to duplicate the taste but sometimes I'm more successful than others. And knowing me, when I felt that it's close enough, I was too lazy to put down the list of ingredients that I put in and so I later forgot about it. Those were pre-this-blog days of course. Now, I try to pay attention to what I use, and how much so that I could share with you all. (I'm amazed by my generosity sometimes.)

So here it is:

Photobucket

INGREDIENTS:
2 servings 

2 bundles of wonton noodles (I particularly like one brand that's only sold at a Viet grocery store here) 
12 round wonton wrappers*
6 large shrimps (or about 1/2 per wonton)
3 oz ground pork
2 Tsp chopped chives
1 large clove of garlic, finely chopped
1 Tsp finely diced fresh water chestnuts (or jicama)
1.5 Tsp soy paste**
1 tsp corn starch
Baby bok choy
2.5 cups homemade (or low-sodium) chicken broth
Spring onion, for garnish
2 Tsp vegetable oil
2 tsp ketchup
Hot sauce (to taste)
3 tsp soy sauce
1 tsp oyster sauce
1 tsp soy paste


*These are sold in hundreds (I think) so I normally freeze them and put them out to thaw about 1.5h before I wrap them. You might want to freeze them in small portions if you don't have a family of 10.
**You might wonder if soy sauce is a good substitute. Well, I think soy paste works better because it's less liquidy, and also tastes different.

METHOD:
Clean the shrimps, chop into small pieces, mix with the corn starch and some soy paste. Set aside. At this point, you probably wonder why corn starch is used here. Well, this is how my friend's mom has always made her wontons. Later on, I read somewhere that the corn starch creates a high pH environment which gives the shrimps the "springy" feel just like when you order them at restaurants. Neat huh?

Mix the ground pork, chopped water chestnuts, chives, and garlic. Add freshly ground black pepper and the remaining soy paste. Mix well. 

Scoop about a Tsp of the pork mixture onto a wonton wrapper, add shrimps, wet the edge with water and seal from one side to the other, make sure no air bubbles are trapped.

Bring water to a boil in a tall sauce pan. Blanch the bok choy (these leaves cook very quickly). Remove. Add the wontons and cook for about 5-7 minutes in boiling water. During the last 2 minutes, use a noodle strainer to blanch the wonton noodles. Note that the blanching time varies, depending on what type you get so make sure you check. Remove the noodles when they are al dente. Strain all the water away. Remove the cooked wontons.

Meanwhile, warm the chicken broth. In a bowl, add 1/3 cup of the broth and the last 6 ingredients. Mix well. Add the strained noodles and toss. Season the remaining broth, divide into 2 small bowls, top with chopped spring onion.

Place the noodles on a plate, arrange the wontons and bok choy around it. Serve with the bowl of broth on the side. 

And in the words of Alton Brown, "I bid you good eats!"

Nov 27, 2011

Bún Thang

I am at a loss as to how to translate the name of this dish. Bún is basically the general term for any type of round rice noodles, but I actually don't know what thang means. What I know, though, is that this dish originates from the Hanoi. I once had it there but I remembered not liking it at all. So I was very skeptical the summer before last when my friend's mom said that this dish would be on the menu when I visited. To be honest, I was hoping there would be something else I could eat. (I didn't say anything though, that would be too rude.) But as it turned out, I was pleasantly surprised! So I asked for the recipe and what I got was a list of ingredients. Yeah, that's how it works, no measuring, just the experience of making a dish multiple times. 

This dish, unlike phở or bún bò, does not have a lot of herbs or spices so it relies solely on the broth. This means if you are going to make it and you have no time to make a good one, just don't bother making it. Also, the not-so-great feature of this dish is that it does not have vegetables. Some people serve this along with bean sprouts but I don't think the original version has them. It's just a bowl of noodle soup for you to gulp down.

Photobucket

Since last summer, I have tried to duplicate this dish twice but I still don't have precise measurements yet so this really is just a rough guide.

INGREDIENTS:
6 servings

2 lb pork bones
1 boned-in skinless chicken breast
2 oz dried shrimps
2 eggs, beaten
3-4 oz pork roll (available at Viet stores)
1 large yellow onion
1 piece of ginger
1 medium dried squid
Small round rice noodles
Vietnamese mint
Mắm tôm - shrimp paste

METHOD:
Warning: The shrimp paste has a very very pungent aroma. It smells much worse than fish sauce to unaccustomed nostrils but completely mouth-watering to the accustomed ones ;).

Trim the chicken breast to remove as much fat as possible.

Broil the onion and ginger.

Grill the dried squid. It's best to do this over charcoal fire but since I live in an apartment, I use methanol gel instead.

Soak the dried shrimps in warm water for about half an hour.

Bring water to a boil, add the pork bones and bring the water back to a boil for about 3min. Pour the water out, rinse the bones carefully with cold water before returning them back to the pot together with cold water. Bring to a boil for about 5 min and reduce heat, let the bones simmer for about 2h. Use a fine mesh to remove the gunk floating to the top while cooking. In the last half an hour, add the chicken breast, the grilled squid, and the broiled onion and ginger to the pot, cook till the chicken is done. Drain the shrimp water into the broth pot. Season with salt to a somewhat undersalted side if you are willing to try the shrimp paste. Remove the chicken breast, let cool.

Discard the bones, keep the broth. Pork bones tend to have high fat content so what I normally do is make the broth, cool it in the refrigerator overnight so that all the fat solidifies and floats to the top. I then strain then broth through a fine mesh/cheese cloth to remove the fat so I end up with a nice broth without having to consume all the fat.

Bring water to a boil in a different pot, add the noodles and cook for about 3min. Rinse with cold water to stop the cooking and let drain.

Shred the chicken.

Grind the dried shrimp using a pestle and mortar. The texture is better this way but if you are lazy, a food processor does an okay job.

Cut the pork roll into fine strips.

Season the beaten eggs with some salt and pepper, then make the thinnest "omelet" possible. Let cool, roll it up and cut into very thin strips.

Chop the mint finely.

Assemble the bowl: place chicken, shrimp, pork, eggs, and chopped mint over the noodles. For an aesthetic effect, place them in a way that creates color contrast. Carefully ladle the boiling broth over the noodle, serve with some shrimp paste. This is perfect for a cold day!!!

Aug 2, 2011

Chicken Drumsticks with Asian Bbq Sauce

This is one of the recipes I keep for those lazy days or when I'm kinda sick of having rice for dinner so I will make this and a salad to accompany it. The problem is that every time I make it, it tastes slightly different because I can't remember what I put in it the previous time. Basically, the sauce is a combination of many different kinds of sauces I have in my kitchen. That said, what I'm going to write down is simply a rough recipe. Go ahead and try it and let me know what you think.

Photobucket

INGREDIENTS:
For about 4 drumsticks

2 Tsp oil
1 tsp five spice
1 tsp each of oyster, worstershire, and terriyaki sauces
1 Tsp hoisin sauce
1.5 tsp sambal oelek (more if you like heat in your food)
1 tsp jam of any kind (I like raspberry)
1 Tsp tarmarind concentrate (found at any Asian grocery store)
2 Tsp chicken stock
1 clove garlic
1 tsp finely minced ginger
Toasted sesame seeds

METHOD:

Preheat the oven to 400°F. Line a baking sheet with aluminum/aluminium foil (unless you absolutely love washing it afterward). Coat the drumstick with the mixture of oil and five spice powder and place them on the sheet. Bake for about 35-40 min, flip the drumsticks half way through.

Meanwhile, blend the rest of the ingredients and cook over low-medium heat until the sauce thickens. If you have too much to worry about, just mix the ingredients together and skip the cooking part altogether. The downside is that garlic burns very easily so you should be careful.

When the chicken is cooked, remove from the sheet, discard the juice. Line the sheet with aluminum foil once again. Arrange the cooked chicken, and brush with the sauce. Broil for about 5-8 minutes till the skin is crispy. Turn twice and add more sauce if necessary.

Remove the chicken drumsticks, toss them in the sauce before rolling over the sesame seeds. Enjoy!

Jul 22, 2011

Ricotta Pancakes and Orange Syrup

Pancakes, what can I say? An American staple? For breakfast at least. My first pancake experience was in Common, one of the dining halls at my college. I wasn't a fan, perhaps because the pancakes weren't good (I don't blame them, it's hard to serve quality ones to hundreds of students) and the syrup was just too sweet for my taste. Then a few years ago I first made my own. That was a completely different experience. And so now and then when I wake up on weekends, sometimes I feel like making pancakes.

This pancake is really moist and fluffy thanks to the whipped egg white and ricotta cheese. The corn meal also adds a nice textural difference to the cakes. The down side is that you kinda do have to put some ingredients on your shopping list as it's not your usual pancake recipe. Well, I made this last weekend for brunch before watching the Women World Cup final between the USA and Japan. Anyway, the US team lost, albeit being the stronger one, which made me too sad to bother posting this earlier. I'm still sad :((, but the pain has subsided.

INGREDIENTS:
Make about 8-9 pancakes, for 2-3 servings
For the syrup:
1 large orange
Granulated sugar

For the topping:
3/4 cup ricotta
2 tsp sugar
1/2 tsp freshly grated lemon zest
1/4 tsp vanilla extract (or seeds from half a vanilla bean)

For the pancakes:
3/4 cup all-purpose flour
2 Tsp fine white cornmeal
1 Tsp sugar
1/4 tsp baking powder
1/4 tsp baking soda
1 cup buttermilk
1 large egg, separated
1/4 cup fresh ricotta
Vegetable oil/spray, for frying

METHOD:
Using a vegetable peeler, peel the orange rind and cut into strips. Blanch the strips in boiling water for 30s.

In a small sauce pan, cook the juice from the orange, orange strips and sugar over medium heat until a syrup if formed, about 10min. How much sugar to use? Well, that's up to your taste. If you want more syrup, you might consider adding more water/orange juice. Cool completely.

Mix all the ingredients for the topping together.

In a large bowl, whisk all the dry ingredients together. In another bowl, whisk the buttermilk, egg yolk and ricotta together until homogeneous. Fold the wet ingredient into the dry one. 

In a medium bowl, using clean beaters, beat the egg white until stiff peaks form. Fold the whipped egg white into the batter.

Heat some oil/spray on a cast iron skillet over moderately high heat. Drop in 1/4-cup batter, cook for about 2 min each side. Serve with the ricotta topping and orange syrup. Add powdered sugar on top if you prefer. Here's my brunch:
Photobucket

That first pancake needed some heat control ;) Nonetheless, I certainly enjoyed mine, hope you do yours!

Jul 11, 2011

Schwarzwälderkirschtorte a.k.a Black Forest Cake ...

... with a twist, that is. Well, one of my very good friends kept telling me to make this one and I promised her I would when cherries are in season in the US, which they are right now. I said with a twist because I got the inspiration from Lindt chilli cherry chocolate bar, i.e. I added some savory spice to my cake ;)

Anyway, cherries are not only in season; they are on sale which means it's the perfect time to make this dessert. Well, that is because I do not fancy the idea of using canned cherries (I'm such a snob sometimes). But of course you are welcome to use them if you don't have access to fresh ones. You probably will find some recipes that call for whipped cream frosting, that's all well and good. I, on the other hand, likes my frosting with chocolate so I made a chocolate whipped cream frosting, yum! Anyway, that's enough of my rambling. Here's your shopping list:

INGREDIENTS:

For the cake:
1 2/3 cups all purpose flour
2/3 cup unsweetened cocoa powder
1 1/2 tsp baking soda
1 tsp salt
1/4 tsp ground cayenne pepper (optional for the faint-hearted ;))
1/2 cup shortening
1 1/3 cups sugar
1 tsp vanilla extract
2 eggs
1 1/2 cups buttermilk

For the filling:
1/3 - 1/2 cup Kirschwasser 
1/2 cup (1 stick) butter
Pinch of salt
2 tsp strong brewed coffee
3/4-1 cup confectioners' sugar (if you want thicker filling, use more sugar to get more volume of course)
1 1/2 lbs pitted fresh cherries 

For the frosting:
5 Tsp unsweetened cocoa powder
5 Tsp confectioners' sugar
1 tsp vanilla extract
2 cups heavy whipping cream (leave some for the plain top if you prefer)
2 tsp Kirschwasser
1 oz semisweet square

Well, there's certainly room for improvement when it comes to my frosting and chocolate shaving skills but trust me when I tell you that it does taste very good.
Photobucket

METHOD:

Line two 8-in round cake pans with parchment paper. Preheat the oven to 375ºF (or 175ºC)

In a medium bowl, sift together the first 5 ingredients, set aside.

In a large bowl, beat the shortening and sugar until light and fluffy, beat in the vanilla and the eggs one at a time. Alternately beat in the flour mixture and buttermilk.

Divide the batter into the pans. Bake for 35-40 minutes or until your favorite cake test says it's done. (The chocolate cake is good on its own if you don't feel like going the extra steps. Just serve it with vanilla ice cream or homemade whipped cream.) Let cool completely, invert, remove the papers, cut each cake horizontally into two.

Meanwhile, in a large bowl, mix the cocoa powder and sugar into the cream. Chill the bowl and the beaters/whisk in teh refrigerator for about 30 minutes.

Sprinkle the Kirschwasser on the four layers. Spread 1/2 of the cream on the first layer, followed by 1/3 of the cherries. Repeat.

Beat the heavy cream until it thickens, add vanilla extract and Kirschwasser, beat until firm. (I like my frosting chocolatey but if you want yours to be more sweet, add more confectioners' sugar.) Frost the top and sides of the cake. Decorate the outer top with frosting and fresh cherries and the middle with chocolate shavings.
Photobucket

Cut and serve. Your family and friends will thank you, or blame you for making them put on weight ;)

Jul 7, 2011

Bánh Nậm

Bánh nậm is one of the various types of bánh from Huế. It's hard to find an English name for it so I will just leave it as that. It often acts as an appetizer and eaten together with other types of bánh Huế. But since I only cook for myself, I eat this dish as a main course.

For people who have had some experience dining at Viet places, whenever someone else mentions Viet food, dishes like phở, bún bò, bánh mì (Viet sandwiches), filtered coffee, etc. come to mind but not something like bánh nậm perhaps because it is time-consuming and is best served warm, which means the restaurants have to always be on their feet if they put this on the menu. 

Every time I go home, I make sure to eat this before I leave. I think for most Vietnamese living in the South, this dish is often one of their favorites. (For people living in the North and have never ventured South or into a restaurant that serves this, it's their loss in my opinion ;)) Anyway, my thought has always been that this is hard to make because you have to get the right consistency for the flour mixture. But craving won over in the end and I decided to give it a try. I guess it's not bad for the first time ;) So here is the recipe for it. Even if you are not inclined to attempt something so time-consuming, I strongly recommend it the next time you make your way to a Viet restaurant that does offer it on the menu. 
Photobucket

INGREDIENTS:
Make about 30 little "flat cakes"

3/4 cup rice flour
1/4 cup tapioca starch
2 cups room-temp water
1 shallot, finely chopped
2 stalks of spring onions, finely sliced
6 oz (200g) large deveined shrimps with heads and shell on
2 oz (50g) cooked lean pork
1 package of banana leaves (can be found in the frozen section of Viet grocery stores)
Cooking oil
Salt and pepper
Cooked Dipping/Sauce For dishes like these, make the sauce with less fish sauce and do not add lime juice.

METHOD:

The photo above is kind of a guide of what you should get at each stage.

Wash the banana leaves carefully to remove dirt. Cut the leaves into pieces about 4-inch long, avoid the broken parts. Tear the ends into small strips to tie the "cakes" together.

Boil the shrimps quickly. Remove, let cool. (I used the water I boil the shrimps in to make my sauce, after straining it of course. It gives the dish extra shrimp flavor and umami.) Remove the shells, heads and tails. Reserve the heads. Pound the shrimps until flaky. (You may choose to use your food processor but there will be a somewhat compromise on the texture.)

In a small bowl, squeeze out the "juice" from the shrimp heads. This gives more color to the final product. (This is completely optional.)

Dice the cooked pork into very small cubes and then give it a few chops. (The reason why I cook the pork before chopping it is because I can't seem to chop uncooked pork as finely as I prefer, perhaps because the muscles are tougher when the meat is raw.)

Heat some oil in a skillet. Add shrimp flakes, turn heat down to low. Use the back of a large spoon to smash the shrimps further until they are dry and look like floss. Remove from heat.

Heat some oil in a skillet. Add the chopped shallot and cook until translucent. Add the pork, season with salt and pepper. Add the shrimp floss and cook for about 2 minutes, stirring frequently. Add the juice from the shrimp heads, cook for another 30 seconds. Add the sliced spring onions. Turn off the heat. Stir to mix.

In a sauce pan, dissolve the flours completely in water. Add 1/2 tsp of salt and 1 tsp cooking oil to stop the cake from sticking to the leaves. Cook the mixture over low heat, stirring constantly. When the mixture starts to thicken, cook for another 2 minutes. At this point, there should be some clumps but some watery part is still there. Remove from heat. Keep stirring constantly until you get a smooth mixture, as pictured above.

Spread about 1 Tsp of the flour in the middle of the leave, about 4-in long and 1.5in wide. (Make sure the flour is not too thick.) Spread the filling on top. Fold the sides over and then fold the ends downwards. Lightly press over the top to even out the flour. Tie the ends of two "cakes" together using the banana strips. Repeat until you run out of flour or filling or banana leaves.

Arrange the cakes standing up in a steamer and steam for about 15-20 minutes.
Photobucket

Let them cool down for a few minutes. Peel off the leaves (they are easier to handle once they have cooled down to being warm and not piping hot) and serve with generous amount of sauce over them. Each spoon that's going to reach your mouth should have a bite of the cake, sauce and perhaps a little piece of Thai chilli. Yum!

Jul 6, 2011

Grilled Meat Noodle

This is my version of quite a popular dish in (the south of) Vietnam called Bún thịt nướng. It's perfect for a summer day although I tend to make it whenever I feel like regardless of what the weather is like. But that's because I grill my meat using an over-the-stove griddle. If you are into grilling outside during the summer, all the more you should try this.

In Vietnam, or in my hometown at least, it's traditionally made with pork, perhaps because it's the cheapest kind of meat there. However, here in the US, if you order it at any Viet restaurant, you have the option of having any of meats you prefer. Also, back in my hometown, the only extra you can add is fried spring rolls but here you may choose to add grilled shrimps, fried rolls or nem nướng. I almost always make it using beef because I think it's tastier than chicken and marinade better than pork, and I often marinade overnight but if you decide to make it on the day, it works fine with an hour of marinading time. This is how the meat looked right before I did the cooking:
Photobucket

Most non-soup noodle dishes in Vietnam are served with smaller kind of noodles because they soak up the fish sauce well. In my hometown we buy freshly made bún (which translates to round rice noodles) whenever we eat them and the choice is really easy: small or large. Here though, round rice noodles can mean so many things, for example, the Chinese mai-fun is thinner than what we have at home. So here I include a photo of the type of noodles I use (easily available at Asian grocery stores) and my favorite herb: (Thai) basil:
Photobucket

Having said that, I once made this dish and served it with wheat noodles as I didn't have access to an Asian grocery store at the time, and it was fine. So let's get started.

INGREDIENTS:
Make about 4-5 servings

For the marinade:
1 lb beef, thinly sliced
1 large shallot, finely minced
3 cloves garlic, finely minced
2 Tsp finely minced lemongrass
2 tsp honey
2 tsp fish sauce
2-3 Tsp cooking wine
White sesame seeds
2 tsp sesame oil

1 package of fine rice vermicelli
3 spring onions
Lettuce and herbs (such as basil, cilantro, mint, etc)
Roughly chopped roasted peanuts
Quick pickled, finely julienned carrots and daikon, recipe here
Cooked Dipping/Sauce to serve, recipe here

METHOD:

For the marinade: Add everything except beef and sesame oil and mix well in a bowl. Then add the beef slices and toss well to make sure all the slices get some marinade. Cover and refrigerate. Before cooking, add the sesame oil and toss well.

Bring water to a boil, add the rice noodles, stir well to prevent sticking. Once the noodles are cooked (about 4-5 min for the thin ones), strain and rinse with cold water, shake off the excess water and let stand. Toss now and then to prevent the noodles from lumping together and taking on the shape of your strainer/colander.

Thinly slice the spring onions, both white and green parts. Heat a little oil in a skillet and give the onions a stir. Remove from heat. (You could also put the onions with some oil in a microwavable bowl and microwave for 30s or more depending on how much onions you have and your microwave setting.)

In my hometown, the most common lettuce are Boston and escarole. Since Boston lettuce bruises easily, escarole finds its way into a lot of noodle dishes. For this one, herbs and escarole leaves are thinly sliced and then place at the bottom of a bowl before serving. I do that now and then but when I'm lazy, I just tear Boston or redleaf lettuce and herbs, which is what I did for this post.

Grill the meat right before serving. (Or stir fry if you don't have a grill.)

Place lettuce and herbs in the bottom of a bowl/deep dish, followed by noodles, then topped with grilled meat, pickled carrots and daikon, onion and chopped peanuts. Serve fish sauce in a bowl on the side for people to add, like this:
Photobucket

Pour fish sauce over the noodles, mix and enjoy.

Fish Sauce Dippings

Like any kind of food, how it is prepared depends on each family and individual's taste. In my family, we have two categories: one is for dishes that require the literal dipping, like fried spring rolls or other types of rice paper rolls, and the other is for dishes where you pour the sauce over, like noodles and "dumplings". I will just call them the Uncooked and Cooked Dipping respectively.

Cooked Dipping/Sauce
Of course it's up to you how you want to make it but if you have never made it before, I suggest trying the following:

Heat 1 part sugar, 5 parts water until the sugar dissolves completely, let it simmer for a while. Turn off heat and let it cool completely. Add fish sauce to taste. Squeeze some lime/lemon before serving if necessary. Serve with finely chopped chilli or sambal oelek. Generally the sugar:fish sauce ratio is about 1:1. Some people like theirs really dense so they let the sugar water mixture cook for a longer time. Some people prefer to cook the fish sauce together with the sugar but if you have close neighbors you might want to spare them since the fish sauce aroma is not for everyone. 

Uncooked Dipping
Slice a clove of garlic. Use a pestle and mortar/bowl to grind garlic + 2tsp sugar + 1/2 a small seeded (keep the seeds if you want yours really hot) Thai chilli until a paste is form. Add 1-2 Tsp water and dissolve. Add fish sauce (and lime juice) to taste. 


Jul 3, 2011

Lemon Semifreddo

Summer is here, it's time for something cool. Today my friend invited a group of us over for dinner, which was really good, and I volunteered to bring dessert. Well, I think I've said this before but volunteering to bring dessert means I get to try making new things without having to consume the entire end-product by myself so why not, right? Anyway, I tried this recipe from Food & Wine but made some small adjustments. After putting the mix into the freezer, I was hoping it would turn out okay. Well, it was better than I expected ;) When my friend said "for something that doesn't contain chocolate, this is really good," I knew it was a success :D
Photobucket

INGREDIENTS:

1 tsp unflavored gelatin
1 Tsp water
6 egg yolks
3 egg whites
1 cup heavy cream
1/3 cup honey (the original recipe called for 1/2 cup, I used less but it's still quite sweet I think so if you like really sweet things, go with 1/2 cup)
1 tsp finely grated lemon zest
3 Tsp lemon juice
Ladyfingers with jam sandwiched in between (the number of ladyfingers you need depend on which type you use. I bought French ones so I used 16 of them)


METHOD: 

Line a loaf pan with parchment paper, leaving ~3 in on each long side.

In a small bowl, sprinkle the gelatin over the water and let stand.

In large bowls, beat the egg whites till stiff peaks are formed, and the heavy cream till firm. Refrigerate.

In a large bowl over simmering water, whisk the egg yolks and honey until the eggs thicken and an instant thermometer reads 160ºF when inserted. Remove from heat.

Add the gelatin, lemon zest and juice to the egg mixture, whisk for another 5 minutes till the eggs have cooled down. Don't leave it stand there to cool, whisking helps the cooling process and incorporates air into the mixture.

Fold the whipped cream and egg whites into the mixture until no streaks remain.

Pour half of the mixture into the pan. Arrange the sandwiched ladyfingers on top and then add the remaining mixture. Add some thinly sliced lemon zest if you like. Lightly cover the top with the overhanging parchment paper. Freeze the mixture for at least 4 hours.

Remove the semifreddo, cut and serve.

I can't resist posting this picture because I really really like my friend's plate. He'd better watch out cuz I might steal one of his one of these days!
Photobucket

Any kind of citrus fruits would work in this recipe as long as the amount of honey is adjusted to compensate the tartness of the fruit. The original recipe in Food & Wine book calls for orange marmalade but I decided raspberry jam would give a better color contrast. Happy making and eating!

Jun 24, 2011

Crème Brûlée

I had my first crème brûlée in Paris and it was love at first bite. I especially love that first bite when you break into the crispy top to dig into the silkily smooth and creamy mixture underneath. Yum! Good food is so much cheaper in Paris in my opinion. Many of the restaurants serve what would be prix fixe menus in the US, perhaps because eating is more a ritual to the French and should be done right and a meal is incomplete without dessert. Even the tiny shops selling paninis give you deals where you get a panini and a nutella crêpe for lunch for, when I was there, 3.5 euros. That's about the cost of a 6-in subway in the US but I suppose most people would take a panini and a crêpe over a 6-in subway anytime, right? 

Well, I am rambling. My point was that while crême brûlée is available at reasonably-priced restaurants in Paris, it is expensive (costing about $10 in Chicago area) and really only available at somewhat fancy places. But it is really very easy to make at home once the proper gadgets are acquired. You will need a kitchen torch, and a few ramekins. I prefer the shallow ones, but you can certainly use the regular 6-oz ones.
Photobucket

INGREDIENTS:
Make 6 servings (using the shallow ramekins)
2.5 cups heavy cream
4 large egg yolks, at room temperature
1 vanilla bean
1/3 cups sugar + more for the top
1.5 pints raspberries
Lemon zest (optional)

METHOD:
Preheat the oven to 325º. Split the vanilla bean, scape the pulp. Put the cream, pulp and the bean itself in a sauce pan over medium heat until the mixture about to boil. Remove the pan from heat, cover and let it cool for about 10-15 minutes. Remove the bean.

In a bowl, whisk the egg yolks and sugar until the color about to lighten. Slowly add the cooled cream to the egg mixture, stirring constantly.

Pour the mixture into the ramekins before placing them into a larger baking pan. Pour hot water into the pan up to about half the height of the ramekins. Cover the pan with aluminum foil (after many trials, I found that covering helps create the perfect top, you can bake without the cover but the heat will create a little burned top, although it's still okay since you will torch the sugar later on anyway but if you allow your guests to do the torching, the foil is a great addition) and bake for about 30 mins (more if you use deeper ramekins) until the crème brûlée is set but the center still jiggles. Remove the ramekins from the pan and chill in the refrigerator for about 2 hours.

Remove the crème brûlée from the refrigerator 30 minutes before serving.

Clean the raspberries before macerating them with about 1 Tsp of sugar and lemon zest.

Spread granulated sugar evenly on top of the crème brûlée, use a kitchen torch to brown the sugar. Add some raspberries on top and serve. I want another one as I'm writing this but I think I have to wait for a while before the next intake of heavy cream :((

Pan-Seared Scallops and Braised Mushrooms

The other day I decided to treat myself to a 3-course dinner right at home. Well, it was almost my birthday so I felt it was justified. That means you get two recipes today. For appetizer, I had a simple green tomato salad with some toasted chopped walnuts so I'm just going to give you a photo. 
Photobucket

Then came something I've been looking forward to making: seared scallops. I have always loved seafood, perhaps because I grew up rather far away from the sea and seafood was often a rare treat as it was (and still is) expensive. But I never got to eat scallops until my last few months in Singapore. Even then, it was dry scallops. Then came graduate school with its wonderful feature called "stipend". Well, I tend to think of it as salary for my teaching duties but whatever it is, it's an income. I think I first had scallops at Spring - a restaurant that is now closed. So this dish is a much simpler version of what they served there.

INGREDIENTS:
Make 1 serving

3-4 large scallops
1 tsp olive oil
1 tsp butter
Salt
Freshly ground black pepper

~15 small dried shiitake mushrooms
~7-8 fresh shiitake mushrooms
~7-9 dried wood ear mushrooms
~4 oz chicken broth
3 Tsp of white wine
3 large cloves of garlic
1 inch of ginger
Oyster sauce
Soy sauce


METHOD:
Soak the dried shiitake and wood ears mushrooms in a bowl of warm water for about 20min. Cut off the stems off.

Bruise the garlic cloves and remove the skins. Peel the ginger and slice it into slices, bruise the slices with the end of a knife, or whatever you prefer.

Put the rehydrated mushrooms, garlic cloves, ginger slices into a small sauce pan, add the chicken broth. Carefully pour about 1 cup of the water used to rehydrate the mushrooms, be careful not to pour the sediments that have settled onto the bottom of the bowl. Add the oyster sauce and soy sauce (how much you add should depend on how salty the chicken broth used is.) Put the pan over medium heat until the water boil, reduce the heat to the lowest setting possible, cover the pan and let it cook for about 20 minutes.

Add the cleaned fresh shiitake mushrooms with their stems cut off to the pan, cook for another 10 minutes.

Remove the cover, add the white wine and turn the heat on to low medium. Cook until most of the liquid has evaporated.

Remove the ginger and the garlic, put the mushrooms onto a deep plate/coupe bowl.

Clean the scallops, remove the side "foot" from each. (Wash them carefully if they came in packing liquid). Pat dry, season with salt and freshly ground black pepper.

Put the olive oil and butter onto a medium skillet on medium high heat until the mixture is about to smoke. Carefully add the scallops, leaving room between them. Cook each side for about 1- 1.5 minutes until about 1/5 of an inch of each side is golden brown and the middle is still translucent.

Place the seared scallops on top of the bed of mushrooms, garnish with young watercress tips or sprouts. Serve immediately.
Photobucket

Bon appetit! The recipe for crème brûlée will follow.

Jun 17, 2011

Chilli Crab

So you have been enjoying your crabs steamed and served with some butter-based dipping or simply with a squeeze of lemon over them. Yes, they are tasty and satisfy your crabby craving but why not try something different for a change? It doesn't take much longer to prepare this dish than to steam your crabs.

Chilli crab is a Singapore signature dish. Albeit the name, it's not very spicy, well it's not served very spicy in Singapore but I'm sure you can add more heat to your own version if you want to. I lived in Singapore for almost 5 years but during that entire time, I could never afford to eat chilli crab. Only later on when I went back for visits that I get to enjoy this specialty. Recently, my friends who are still living in Singapore posted photos of them enjoying this dish and all of a sudden, the craving resurfaced! I'm going to be back there in less than 2 months but I just can't wait that long. Also, this is my last free weekend before I start teaching again. Yes, I know, my break is too short!!! Anyway, I decided I will spoil myself rotten this whole entire weekend ;) 

So here is the story. I went to Chinatown to get grocery. I was debating between frozen crabs and live ones. (The cost difference was huge, hence the hesitation.) What if I fail in my attempt to make the sauce? Then a live crab would be a waste. But then what if the sauce turns out amazing? Well, after about 5 minutes of my angelic side battling my evil side, the evil one won and I got myself a live crab. This is my first time dealing with live anything so you can guess my nervousness. I was hoping that somehow the half-hour trip back would kill the crab so I don't have to deal with it later on. 

The first thing I did once I got home was putting the crab, in the original packaging that the man at the store put it in, into my refrigerator. Hours later and it was time to get dinner ready. I took the bag out, carefully removing the staples at the top and alas! The crab is still alive!!! Turned out the hardest part of tonight's dinner was the actual killing of the crab. I will spare you the horrific details but let me just say that I felt like a psychopathic murderer afterwards. The feeling didn't last long though! By the time I was done cooking, I had forgotten about the "ordeal" I went through, that is until now when I sit here recalling the whole process. So here is what I managed to produce at the end:
Photobucket

For those of you who are not familiar with the dish, Singapore chilli crab is traditionally served with fried mantous, a kind of plain Chinese buns, pictured on the top right. But I think if you can't lay hands on those little things, sliced baguette or crispy Italian bread would make a fine replacement. Chilli crab in Singapore tends to lean a little bit over to the sweet side even though it's a savory dish. I didn't put nearly as much sugar and I'm not claiming that this is authentic but here is a recipe if you want to try:

INGREDIENTS:

For the crab:
1 large crab, ~2 lbs
4-5 plum tomatoes
1 Tsp tamarind concentrate
1/2 Tsp ketchup
1.5 Tsp sugar
3 cloves of garlic, finely chopped
1 small shallot, finely chopped
1 inch ginger, finely chopped
1-2 Thai chillis, seeded and finely chopped (keep the seeds if you want more heat)
1 Tsp soy sauce paste
1 tsp oyster sauce
Chicken stock (I eventually used half a 14oz can, i.e. ~7oz)
1/2 tsp freshly ground black/white pepper
1/2 a beaten egg (optional)
Cilantro to garnish
1 Tsp oil

For the mantous:
Frozen mantous, completely thawed (or make your own but I don't have a recipe on hand)
Oil to fry


METHOD:

Clean the crab carefully, keep the carapace to decorate later. Remove all the inedible parts. Cut the crab into 4, smash the large claws slightly.

Boil the tomatoes, remove the skin and seeds, give them a rough chop and transfer them to a blender. Add the sugar and some chicken stock to blend until smooth.

In a medium/large sauce pan (a wok would be ideal), heat the oil over medium heat. Add the shallots and cook till translucent. Add ginger and stir till fragrant. Add garlic and chilli and fry for about 30 seconds. Transfer the tomato sauce to the pan, add more chicken stock if the sauce is too thick. Add soy sauce paste, oyster sauce, ketchup and give it a quick stir. Reduce the heat to low and let the mixture partner for a while. (I think people usually use the word "marry" but as of now, there are still a reasonable percentage of the US population and the world at large who are still fighting for the right to marry so I decided to use the word "partner" instead.) Taste the sauce, if it's not salty enough, don't worry, the crab will add some saltiness to the sauce later.

Add the crab pieces and let them cook till done. The juice from the crab will thicken the sauce so there is no need for thickening agents. Remove the crab pieces and arrange on a deep dish. Check the sauce to see if it's to your taste. If it's too thick, add water or chicken stock. Make sure you have enough sauce to dunk the mantous/bread slices later. Still keeping the sauce on low heat, add half of a beaten egg slowly while stirring. This creates another dimension to the visual effect. Skip it if you don't like.

Pour the sauce over the crab pieces, garnish with cilantro leaves.

For the mantous, give them a quick steam before you fry them to golden.

Serve the chilli crab with the mantous. The mantous, soaked with the sauce, are simply so yummy I wish I could send them to you via the world wide web. I have friends who swear they don't need the crabs, all they need are the sauce and the crisp fried mantous. But maybe they are pulling my legs, who knows!
Photobucket

So what are you waiting for??? Go put your bib on, roll your sleeves up and dig in!!!!

*If you want your sauce to have a brighter red color, season it with salt instead of soy sauce paste and oyster sauce.

Jun 12, 2011

Chè Trôi Nước

This is another sweet soup that I had made before I decided to start this blog so I didn't quite pay that much attention to the quality of the photos. Maybe one day when I make this again I will update the photos.

Chè trôi nước is similar to the Chinese tang yuan dessert except we use mung beans for the filling instead of red beans or black sesame seeds, and we add ginger to the syrup. It's served hot so is great for those chilly days. 

This dish is quite simple, the only difficulty lies in making the dough. It's the reason why Hồ Xuân Hương (1772–1822), female poet, arguably the first outspoken Vietnamese feminist, wrote a poem in which she used the image of the glutinous rice balls to talk about the fate of Viet women of the time (or even now):
 Rắn nát mặc dù tay kẻ nặn
which loosely/literally translate as "whether being whole or broken depends on the hands of the maker".

Well, that's a tiny little glimpse into Viet literary world. Let's start cracking, shall we?

INGREDIENTS:
Make about 4-8 servings

1/3-1/2 cup dry mung beans, soaked for about 2 hours
1 tsp vegetable oil
1/2 small shallot, finely chopped
Salt
Brown sugar, to taste
6 cups of water (less if you are going to serve 2 glutinous rice balls as 1 portion)
2-in piece of ginger, 2/3 cut into thin strips, 1/3 finely minced
1 cup of glutinous rice flour 
1/2 cup boiling water
White sesame seeds, toasted to golden
Coconut cream.

METHOD:
Steam the mung beans until soft, blend with 3Tsp of sugar and a pinch of salt till smooth. Heat the oil over medium heat, saute the chopped shallot until soft. Add the chopped ginger and cook for about 1min. Reduce the heat to low. Add the mung bean past. Add more sugar until the paste is slightly sweet. Cook until the paste is dry, stirring often.

Meanwhile, in a sauce pan over medium high heat, heat the 6 cups of water, brown sugar and ginger strips until the water boils and the sugar has completely dissolved. Reduce the heat to low and let the syrup cook to infuse it with the ginger flavor.

In a medium bowl, combine the flour and a pinch of salt. Gradually add boiling water until a soft dough is formed, knead lightly till smooth. Divide the dough into balls of ~1-inch in diameter. 

Form the mung bean paste into balls that are slightly smaller than the dough balls. Flatten each dough ball, put a bean paste ball in the middle. Fold and edge and roll to close. Repeat until done. If there is left over dough, roll them into tiny little balls.

In a different pot, bring water to a boil. Add the rice balls to cook. When they float to the surface, remove them using a slotted spoon and place them under running water for about 2 min. 

Put the rice balls into the syrup pan. Turn the heat back on until the liquid boils. Turn the heat off. At this point, you should get something like this:
Photobucket

You can serve the coconut cream straight up but I normally like to cook it for a bit before serving. Pour the coconut cream into a small sauce pan over low to medium heat, add a pinch of salt and 1Tsp of sugar, cook until the cream thickens. If you like really thick coconut cream, add some corn starch dissolved in water. 

Serve one or two rice balls in a small bowl, top with coconut cream and toasted sesame seeds. Enjoy the dessert, and remember to exercise afterward ;)

Photobucket

I think some people add pandan leaves to the syrup but I like the ginger flavor to stand out so I don't.

Jun 10, 2011

Very Bananary Banana Bread

I'm not quite a fan of banana breads; in fact, I am not a fan of bananas, except for this one dessert in Vietnam where a type of bananas that is not available in the US is coated with a thin layer of glutinous rice, then wrapped in banana leave and grilled over charcoals until the banana leave is charred. The leaf is then peeled off and the banana served with a coconut and tapioca sauce. Yum! Yum! (Gotta bring my train of thought back to the here and now before I start salivating.) Anyway, I have a friend who loves banana breads, her kids are even bigger fans so I decided to make it a while back. Then, the class I taught this quarter had their exam in the afternoon so I decided to bake them banana and zucchini breads instead of the usual cookies. I think I've got the recipe down, and it's super easy ;)
Photobucket

Let's get started, shall we?
INGREDIENTS:
Make 1 loaf

2 cups all purpose flour
1 tsp baking soda
1/4 tsp salt
1/4 tsp freshly ground nutmeg
1/2 tsp ground cinnamon
1/2 cup butter
3/4 cup brown sugar
2 eggs, room temp
5 large overripe bananas, mashed
1/2 cup of roasted walnuts, chopped

METHOD:
Preheat the oven to 350º. Lightly grease a 9x5 inch loaf pan. 

In a large bowl, combine the dry ingredients. 

In another bowl, cream the butter and brown sugar. Stir in beaten eggs and mashed bananas until well-blended. Stir the banana mixture into the dry mixture, just until moisten. Fold in the nuts. Pour the batter into the prepared pan.

Bake until a toothpick inserted into the center comes out clean, about 50-55 minutes. Let bread cool in pan for about 10min before turning it out to cool on a wire rack. Cut and serve.

Photobucket
For the banana fans out there, enjoy!

Chocolate Soufflé

I've been busy and so neglected this page for a while, oops!

A few weeks back I tried making chocolate soufflé following a recipe from Food and Wine magazine. It's hard for me to say how successful it was cuz not that many restaurants have soufflé on their dessert lists, well, not that many affordable ones anyway. I'm quite easy to please when it comes to desserts, as long as they are chocolaty so I was pretty pleased with the outcome.
Photobucket

The soufflé wasn't served with the Sapporo in the background, my friend just had beer with dinner beforehand.

Here comes the recipe, let your chocoholic self come out and play!
INGREDIENTS:
Make about 5 6-oz servings or 8 4-oz servings
2oz chocolate wafer cookies, finely crushed
1/2 cup + 2Tsp granulated sugar
3 Tsp unsalted butter, softened, and more for brushing
6oz bittersweet chocolate, chopped
2oz unsweetened chocolate, chopped
4 large egg yolks + 6 large egg whites, at room temp.
Pinch of salt.

METHOD:
In a medium bowl, combine the crushed chocolate wafer cookies with 2 Tsp of granulated sugar. Brush the ramekins with softened butter and coat them with the cookie mixture, pouring out and keeping the excess for later use. Place the ramekins on a baking sheet and refrigerate.

Melt the 3Tsp butter and chocolate over simmering water, stirring frequently until smooth. Remove the chocolate mixture and let it cool completely.

Preheat the oven to 400º. 

In a large bowl, beat the egg yolks with 6Tsp of sugar at medium speed until pale yellow and thickened. Gradually beat in the cooled chocolate mixture.
In another large bowl, using clean beaters, beat the egg whites with the pinch of salt until the whites form soft peaks. Gradually beat in the remaining 2Tsp of sugar until the beaten whites are glossy. Beat in one-fourth of the whites into the chocolate mixture before gently folding in the remaining until no streaks remain.
Carefully spoon the batter into the prepared ramekins, filling them almost to the top. Sprinkle each soufflé with 1/2 tsp of the cookie mixture. Run your thumb inside the rim of each ramekin to smooth the sides of the soufflés and help them rise evenly. (I didn't pay much attention to this step, hence the sharp edges in the photo above.)

Bake in the center of the oven until they are risen and firm around the edges but still soft in the center, about 15 minutes, serve immediately.
Photobucket

Bon appétit!

May 16, 2011

Chè Sâm Bổ Lượng - Another Vietnamese Chè

This is another of my favorite Viet "sweet soups" (for another fav of mine, check here), I used to buy it from a store/shop near both my house and school. It's very very nice on a warm day being a cold chè. Now that I think about it, my grandmother can cook a lot of dishes well but she rarely make any attempts at chè, our family almost always buy these sweet treats, odd! Maybe I can convince her to make some this summer, or maybe if I feel like it, I might even show her that I'm not so terrible in the kitchen. To her credit, my grandmother, unlike most women her generation, never ever used that phrase "you are a girl, you should learn to cook blah blah blah" on me when I was living at home.
Back to the task at hand, this dessert is easy to make. Honestly, I don't know if I missed out anything. I think I managed to get hold of all the ingredients that the store near my house uses but I'm sure there are other variants. A friend said I should put up photos of the ingredients and/or photos taken along the cooking process too but 1)I tend to forget my camera until I'm done cooking, and 2)my kitchen isn't so photo-worthy. But this time, since most of the ingredients are dry, it was easy for me to take some photos so here you are:
Photobucket

The list of ingredients goes from top left to bottom right of the photo above. Apart from barley and brown sugar, you may find the rest at any chinatown's grocery store.

INGREDIENTS:
Make about 5-6 servings

2oz dried longans, soaked in water for 15min
12 (or more, to your preference) black dates, soaked in water for 15min
1/2 cup brown sugar
Shredded kelp/seaweed
2oz barley, soaked for 15min
*2oz dried lotus seeds, soaked in warm water for an hour or so

*If you want this dessert on a lazy day, you might want to use canned cooked lotus seeds but consume preservatives at your own risks ;)

METHOD:
You can make everything in one pot if you know how long each ingredient is going to take so you can plan for everything to be cooked just right once it's done. However, since it was my first attempt, I cooked lotus seeds and barley separately.
Photobucket
Cook barley till al dente. Remove the stems inside the lotus seeds before cooking them until al dente. Drain both.

In a pot, cook the sugar in 5 cups of water until the sugar has dissolved completely. Add dates, longans, cooked lotus seeds, and barley to the syrup, cook until barley and lotus seeds are tender, about another 5 min. Turn off the heat and let cool to room temperature.

Rinse the fresh kelp well, cook it in boiling water for about 2 min. Immediately dunk the kelp in a bowl of iced water to quench the cooking process. Overcooking the kelp will result in a mushy-and-certainly-unappetizing mess. Cut into 1.5in strips. Add these strips to the mixture once it has cooled. Chill the dessert in a fridge and serve with ice cubes.

May 9, 2011

Chocolate Ganache Tart

Have you ever ordered a cake for dessert and ended up liking the chocolate ganache/frosting much more than the cake itself? Or a chocolate ganache for dessert and the portion was too small to satisfy your chocoholic self? I have. So I decided to try making this at home but eating the whole 9in portion by myself would more likely be a heart attack in the making than a dessert. Lucky me, my friend's birthday was approaching so I decided that would be her birthday "cake". Well, it wasn't a typical birthday cake but I don't think she complained, or maybe I was too busy enjoying my portion to hear ;)

Let's see. I would describe this as a smooth chocolate bar with a crunchy crust. Even better, the crust is super easy even I could make it. So I think it's a great thing for you to bring to the next party full of chocolate lovers that you are invited to, if you run out of ideas.
Photobucket
(Please excuse my lack of plating ideas!)

Without further ado, here is the recipe:
INGREDIENTS:
For the crust:
1 stick unsalted butter, melted
3 Tsp granulated sugar
1/4 tsp salt
1 1/4 cups all-purpose flour
1 tsp vanilla extract (or seeds from a vanilla bean if you are feeling fancy)

For the filling:
8 oz bittersweet chocolate, chopped
4 oz semisweet chocolate, chopped
4 Tsp unsalted butter, cut into pieces for easy melting
1 cup whipping cream
3 Tsp granulated sugar
1/4 tsp salt

METHOD:
In a medium bowl, combine butter, sugar, vanilla, and salt. Stir until even. Add in the flour and stir until combined and a soft dough is formed.

Spread the dough over the bottom of a 9-in round tart pan with removable bottom. Press the dough evenly onto the bottom and up the sides of the pan. Cover with a plastic wrap and let it rest in the refrigerator for 30min. Be careful while moving the pan. I forgot the bottom was removable on my first try and had to re-press the dough but it didn't take that long.

Preheat the oven to 350ºF, position a rack in the middle. Take the shell out, prick evenly with a fork (you don't want air destroying your beautifully made shell, do you?) and then bake until golden brown.

Remove the pan and let it cool completely on a wire rack.

Place chocolate and butter in a medium bowl. Combine the cream, salt, and sugar in a sauce pan over medium heat and stir until sugar has completely dissolved and the liquid is just about to simmer.

Pour the liquid over the chocolate and butter and let it sit until the chocolate and butter have melted, ~4min. Gently stir until smooth. Practice self-control, don't pick up a spoon and eat this all up. Tell yourself the end result is very much worth waiting for ;)

Pour ganache over the cool tart shelf, smooth the surface with a spatula and transfer to a refrigerator to chill until set, about 1.5h.

Cut and serve!

Apr 22, 2011

Nem Nướng - Vietnamese Grilled Pork Skewers

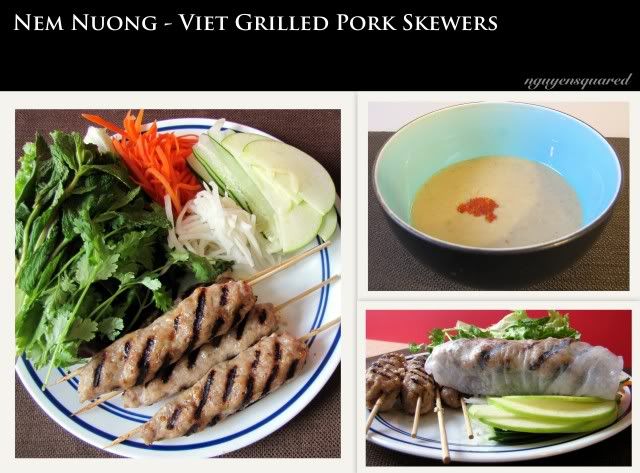
I think Vietnamese are obsessed with rice papers, we can wrap almost anything in rice papers, and then dunk them in sauces before savoring them. Many of these wraps have special names by which Vietnamese identify ingredients as well as methods of cooking. Nem nướng is one of them and it happens to be one of my favorites. 

Rumor has it that nem nướng originates from Khanh Hoa, a province along the central coastal area. I don't know when nem nướng migrated to my hometown nor do I remember my first time eating it but I do know I have always loved this dish. Later on, people added served fried rolled rice papers along to create a crunch when you bite into the wrap. I personally have never been a fan. Plus, the fried rice papers tend to be overly oily. I also learned later that in some areas, these fried rice papers also contain tiny shrimps.

When I was still at home, this was something we only got during special occasions because it wasn't cheap. (I don't know why we never made it at home hmm.) Then I went away for school and whenever I came back for a visit, my family always made sure I got to eat it at least once before I left again.

I have never eaten nem nướng anywhere else in Vietnam. I'm funny that way. I can be adventurous enough to try completely new cuisines but when it comes to some dishes that I dearly love, I only want to eat them at places that I always eat at. I fear eating them somewhere else would spoil the whole thing for me. Of all the years I have been in the US, I only ate nem nướng once and it was ok, not outstanding. It is also in the US that I learn nem nướng could be served with vermicelli as a noodle dish or as filling in Vietnamese sandwiches. In Vietnam (or at least in my hometown), it is exclusively served on its own, wrapped in rice papers with lettuce and herbs.

I often craved for the nem nướng I can get in my hometown. That is, until I tried making it for the first time ;) I don't know if I've gotten so used to my own cooking or if the quality of nem nướng at my fav store back home has gone down the hill over the years but now it's no longer the first thing I want to eat once I get home.

To be honest, the recipe I'm going to write down below is still just an approximation because I do a lot of tasting and modifying along the way that I tend to lose track of how much of what has been added so please bear with me. I have to say that it took great self-discipline from me to take the photos you see here. The moment I was done grilling my skewers, all I wanted to do was sitting down and devouring them. But for the sake of my readers (I don't know if you actually read but I assume you do, just for my ego's sake), I tried so hard to pretend my nostrils weren't under attack by General Aroma. So here it is:

Photobucket


INGREDIENTS:
Make about 6-8 servings

For the meat:
2 lbs ground pork*
1 medium onion
6 cloves garlic
2 Tsp honey
2 Tsp corn starch
4 Tsp fish sauce
1 Tsp fresh ground white pepper
Skewers, soaked overnight
Roasted rice powder (optional) 

Pickled carrots and daikon (recipe at the end)
Green/red leaf lettuce
1 cucumber, thinly sliced lengthwise
2 granny smith apple, thinly sliced**
Herbs: cilantro, mint, Viet basil, chives, etc.
Rice papers

For the dipping sauce:
1/3 cup mung beans
1/3 cup glutinous rice
1 Tsp oil
1 large clove garlic, finely minced
11/2 Tsp peanut butter
Sugar
Salt
Fermented soy bean paste (Tuong Cu Da) (optional)
Some ground pork (optional)
Annatto seeds (optional)


** Back home, this dish is served with sliced star fruit and young banana. I find granny smith apples to be a wonderful substitute for star fruit.


METHOD:
To make the meat skewers:
*I find that the ground pork available at grocery store contains too much fat so I normally get half ground pork and half lean pork and then grind it myself at home. It's healthier this way. However, the downside is that the pork is less juicy and so I make up for that with the onion. 

Process the ground pork, onion, and garlic together. Transfer to a bowl. In a small bowl, mix together the corn starch, honey, pepper, and fish sauce. Add this mixture to the ground meat and mix well. (I have a strong suspicion that the owners of many nem nuong places in my hometown add food coloring to the marinade too because I can't seem to be able to reproduce the color. But it could just be my lack of skills, who knows.) At this point, I normally heat a small non stick skillet to cook a bit of the meat mixture to see if it tastes good. Marinate overnight in the refrigerator. You can get away with marinating it for a few hours but I find that it's best left overnight.

Form the marinated meat into sausages about 4in long and put the skewers through. (Here you have the option of making really thin skewers so that you can just pull one off and place in your roll later or form slightly larger ones then slice lengthwise later. I find slicing my grilled pork lengthwise makes it easier to wrap as there is a flat edge.) Cook the skewers on a bbq or broil in the oven. Broiling tends to make the meat drier. My solution (as I don't have an outdoors bbq) is to use a griddle over my gas stoves. To prevent sticking, lightly brush the skewers with oil before cooking. 

To make the dipping sauce:
Soak the mung bean and glutinous rice in water for about 30min. Cook until tender. If you are lazy, you can cook both together. Transfer the cooked rice and beans into the blender (but do not add too much water), add peanut butter and process until smooth. In a sauce pan, heat the oil on medium heat. If you prefer some color in your dipping sauce, bleed the annatto seeds in the hot oil. Remove the seeds. Add the garlic and cook till fragrant, about 30s. Add the ground meat if you choose to use it. Fry and stir constantly to break up the meat into tiny pieces. Add the bean and rice puree. Lower the heat, add the soy bean paste and season with salt and sugar to taste. (Sometimes I season the dipping sauce with condensed milk in place of sugar.) Stir constantly to prevent burning. Cook for about 2-3 min. The sauce should have the consistency of a creamy soup. Remove from heat. 

Serve the grilled pork skewers with vegetables. Provide a large bowl of water for guests to soften the rice papers. Place the vegetables on a corner of the rice paper, fold 2 sides in, roll while keeping a tight hold on the paper. Before getting to the end of the paper, place the grilled pork and continue rolling. You may want to place the pork together with the vegetables but your roll won't look as appetizing ;) There is no trick to making wraps/rolls except the one simple-but-hard-to-follow rule: do not, and I repeat, DO NOT, put too much on your rice paper.

Enjoy!!!


To make the pickled carrots and daikon:
Pickled carrots and daikon are found in many Viet dishes. The size of the pickles vary from dish to dish but the principle is the same. For this dish, you want your pickles to have somewhat a prominent presence so julienne both carrots and daikon. Here, the largest size of a mandolin slicer is perfect. (To serve pickles in vermicelli, for example, you want smaller cuts, i.e. medium size on the mandolin slicer.) You might find that daikon has too strong an aroma. What I do with it is that I mix the julienned daikon with salt and let it stand for about 30min. I then rinse the daikon well and then squeeze out as much liquid as I can before putting it into my pickling liquid. 

To make the pickling liquid: mix together one part rice vinegar and 1 part sugar. Place the carrots and daikon in a container, pour the liquid over the carrots and daikon. Cover and refrigerate. This keeps for at least a week. I can't tell if it's good for a longer period since I always finish it before the week is over. 


Apr 17, 2011

Pots de Crème with White Chocolate and Cayenne Pepper Whipped Cream

I was inspired by what chef Robert Irvine did in the elimination round of Chopped All Stars when he was up against chef Anne Burrell. Well, I was rooting for chef Anne (something about her attitude in the kitchen is just so gripping) but chef Robert's dessert looked so good I almost licked my tv screen. Sigh!!! For those not familiar with the show, every chopped episode starts with 4 chefs. They are asked to first make appetizer, then main course, and finally dessert. After each round, one is "chopped" so that at the very end there is one winner. The twist is that they have to use all the mysterious ingredients that are given to them for each round. Anyway, I can't remember exactly what were in the basket when dessert round came. All I can remember is the end product: small, cute, and certainly mouth-watering pots de crème. Chef Robert created a twist when he added ground black pepper to the whipped cream. After watching that episode, I swore I'd make pots de crème soon. And I thought about adding cayenne pepper instead. I'm pretty sure people have done this before but hey, I didn't look it up in a recipe book or on the internet so I'm just going to claim that it's my creation for now ;)

The "problem" with pots de crème is that they are extremely rich and I wasn't going to make a multitude of them and then eat them all by myself so I was patiently waiting for a chance. And then came 2 willing guinea pigs, I meant lunch guests. So I made nem nướng, Vietnamese skewered pork wrapped in lettuce and herbs, and served with peanut-based dipping sauce (recipe to follow soonish, I promise) and pots de crème for dessert. So here it is:

Photobucket

INGREDIENTS:
Make about 8 servings

For the pots de creme:
3 oz bittersweet chocolate, chopped
2 cups heavy cream
1/2 cup milk
5 egg yolks
1/4 cup granulated sugar
pinch of salt

For the whipped cream:
1.5 cup whipping cream
2 oz white chocolate
Cayenne pepper

METHOD:
Place rack in the center of the oven, preheat oven to 375 degrees F.

In a large bowl, melt the chocolate over gently simmering water. Remove from heat and set aside.

Heat the milk and cream in a saucepan over low heat until the mixture is about to boil.

In a medium bowl, whisk the egg yolks, sugar and salt until the sugar dissolves completely. Temper the egg mixture with the cream. (See, I'm learning the lingo here.) That is, add the cream mixture very slowly to the egg mixture while whisking constantly. This is to prevent the hot cream from cooking the eggs.

Now, add the egg+cream mixture slowly over a strainer to the chocolate. Keep whisking constantly.

Ladle the chocolate mixture into 8 6oz ramekins (or specialized pots for pots de creme).

Line the bottom of a baking pan with paper towels. Place the filled ramekins over the towels, add hot water to the pan so that it reaches about halfway up the sides of the ramekins. Cover the entire pan with foil.

Carefully place the pan onto the rack and bake until the mixture around the edges of the ramekin is firm when slightly shaken. (This takes about 30-35 min but it depends on your oven temperature and the thickness of your ramekins.) It's okay if the middle still jiggles. Carefully remove the ramekins and let them cool. Once they have cooled down, chill them in the fridge for 2-3 hours.

Melt the white chocolate, let cool to room temperature. Whip the whipping cream in a chilled bowl until soft peaks are form. Fold in the chocolate and whip till stiff peaks are formed. If you are willing to try whipped cream with cayenne pepper, add about 1tsp of cayenne pepper near the end of the whipping process.

Serve the chilled pots de creme with a spoonful of whipped cream on top. Bon appetit!!!

I have a feeling fine fleur de sel (or bacon bits if you are feeling even more adventurous) would make a great variation for the whipped cream topping too!

Apr 15, 2011

Crêpes, oh crêpes

I first learned to make crepes when I was in primary/grade school. It was a rare treat for poor kids like us. My grandmother would make the batter (she told us she had learned that while working as a cook for some French people) and I would be allowed to make the crêpes. My uncle would cut about 8in off a banana leave stalk (we still had banana trees in our garden then) and split one end into strips. That would be my disposable oil brush. Some creativity there!!!! At the time I thought what my grandmother said was something to humor a kid who didn't have access to fancy food. And French food always sounds uber fancy!!! I mean how could something so simple be ... French? During my junior year in college, I spent a semester abroad in Paris and crêpes almost became a daily ritual. Who could resist 3.5-4 euros deals of 1 panini and 1 nutella crêpe, right? Sure they were so much bigger, and richer with butter but they taste very much the same as the ones my grandmother taught me to make. I'm still amazed by the fact that I didn't put on weight at the end of the semester given the amount of starch I consumed during those months!! Oh I know why, that was because my host mom kinda starved us when dinner came! That's another story for another time perhaps.

One thing that annoys me (I'm picky I know) is that many people (especially Americans) say something like "oh crêpes, you mean the French pancake?" and I'm thinking in my head (well, sometimes what I think in my head makes its way to my mouth too) "what the heck!!" I mean, sure, they both contain egg, milk and flour but they are definitely not the same! While pancakes rely on your not overmixing the batter and baking power and baking soda to become fluffy, the batter for crêpes does not use any baking soda/powder and requires thorough mixing for they are so much more delicate.

I actually don't make crêpes very often since I can't finish 12 crepes in 2-3 days even though I do like them very much. But since mangoes were on sale, I thought they would make great filling for crepes ;) and that turned out to be true. So here you are

Photobucket

I think I saved this recipe after watching the Good Eats episode in which Alton Brown was making crêpes.


INGREDIENTS:
Make about 12 crêpes

2 large eggs
3/4 cup milk
1/2 cup water
1 cup flour
3 Tsp melted butter
Butter, for coating the pan

*For sweet crêpes: Add 2Tsp sugar and 1tsp vanilla extract
For savory ones: Add 1/4 tsp salt and your favorite chopped herb(s)

METHOD:
In a blender, combine all the ingredients and pulse until very well mixed. This doesn't take too long, probably about 10-15s.

Chill the crepe batter for 1h. This gives the bubbles time to subside and crepes will be less likely to tear during cooking. The batter is good for up to 48h.

Heat a non-stick pan. Add butter to coat. Pour 1 ounce of batter into the center of the pan and swirl to spread the batter evenly. Cook for 30s and flip. Cook for another 10s and remove to a cutting board to cool. Repeat until the batter is finished. Once the crêpes have cooled down completely, they can be stacked and stored in a resealable plastic bag in the fridge for a few days or in the freezer for up to 2 months. (I put a layer of plastic wrap in between 2 crepes while stacking, parchment paper works just as well.) Frozen crêpes should be thawed on a rack completely before use. 

Bon appetit!

*If you are indecisive like me, you could do what I did. I added the vanilla extract and 1Tsp sugar. This way I could use my crêpes for both sweet and savory fillings.

For a healthy serving: add strawberries (or any kind of berries really) macerated in 1Tsp sugar and lemon zest and lemon juice.

For a more indulgent version: add your favorite homemade ice cream or whipped cream or whatever else you fancy.

I filled my savory crepes with spinach (quickly tossed in a dressing of extra virgin olive oil, lemon juice, honey and Dijon mustard), prosciutto torn into small pieces, sliced sun-dried tomatoes and crumbles Gorgonzola. The sweetness from the dressing balances the saltiness from the prosciutto and cheese well, yummy!!!!